
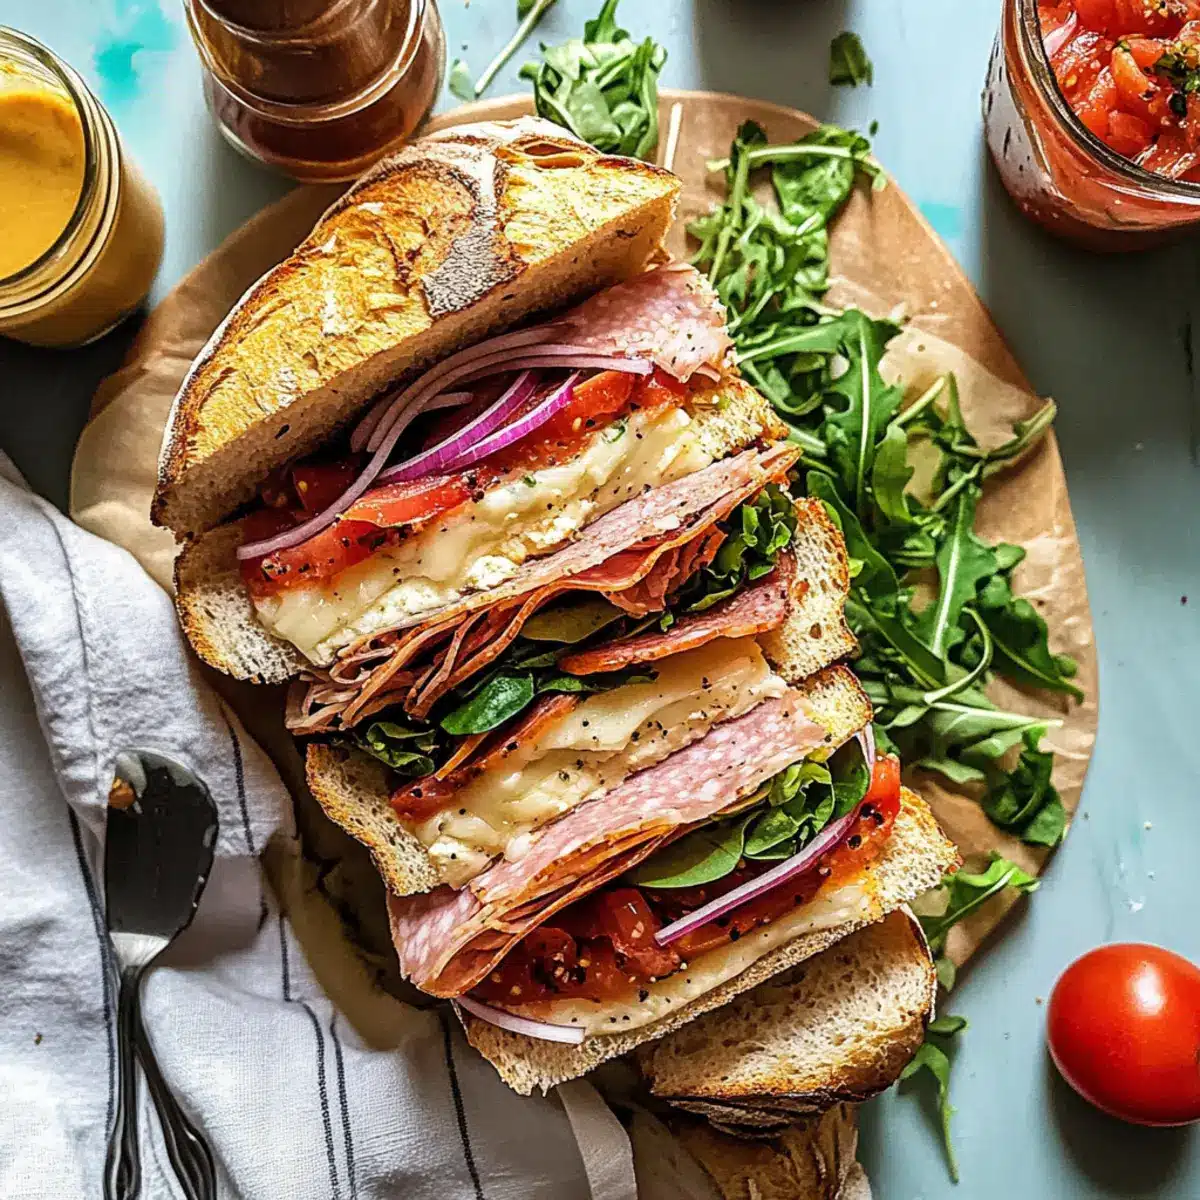
As I strolled through the bustling streets of Italy, the aroma of freshly baked bread mingled with enticing scents of cured meats and ripe tomatoes, igniting my culinary curiosity. That moment inspired me to recreate the essence of Italian street food in my own kitchen. Introducing my Italian Picnic Sandwich—a delightful creation perfect for gatherings and casual picnics alike. With its sturdy ciabatta bread packed with savory meats, creamy cheeses, and vibrant veggies, this sandwich is not just a meal; it’s a crowd-pleaser, effortlessly bringing folks together. Plus, it requires minimal prep time, ensuring you spend less time cooking and more time enjoying the company of loved ones. So, are you ready to take your taste buds on an Italian adventure?
Why is this sandwich a must-try?
Crowd-Pleasing Delight: This Italian Picnic Sandwich is designed to impress, making it a perfect centerpiece for any gathering.
Robust Flavors: Combining rich Italian meats, creamy cheeses, and fresh veggies creates a burst of flavors in every bite.
Quick Preparation: With minimal prep time, you can whip up this delicious sandwich and spend more time with your guests.
Versatile Ingredients: Feel free to customize with your favorite meats or cheeses, like using Stracotto Italian Pot for a heartier option!
Hearty and Satisfying: Its generous size ensures that everyone leaves happy and full, making it a recipe you’ll turn to time and again.
Italian Picnic Sandwich Ingredients
• Get ready to create a delightful masterpiece!
For the Marinated Onions
- Red Onion – Adds tang and crunch; marinate for at least 30 minutes for optimal flavor.
- High-Quality Olive Oil – Enhances the marinated onions; use a light oil for a less intense flavor.
- Red Wine Vinegar – Provides acidity to balance flavors; white wine vinegar can be a substitute.
- Dried Oregano – Infuses the dish with an herby flavor; fresh oregano can be used if available.
- Kosher Salt – Enhances overall flavor; sea salt can serve as a substitute.
For the Bread and Spreads
- Ciabatta Bread (12-14″ long) – The base of the sandwich for a sturdy texture; baguette can be an alternative.
- Mayonnaise – Adds creaminess; Greek yogurt can be a healthier substitute.
- Calabrian Chili Paste – Adds a spicy kick; substitute with sriracha or a milder chili paste for less heat.
For the Meats and Cheeses
- Provolone Cheese (8 slices) – Melts beautifully and adds flavor; mozzarella can be a substitute for a milder taste.
- Mortadella (8 oz) – Rich and fatty Italian meat; ham can be used for a different flavor profile.
- Capocollo (4 oz) – Adds spice and flavor; soppressata can be substituted if preferred.
- Genoa Salami (4 oz) – Offers a traditional Italian taste; other types of salami may work.
- Soppressata (4 oz) – Includes a robust flavor; chorizo or other cured meats can be alternative options.
- Fresh Mozzarella (6 oz, torn) – Creamy texture and taste; burrata can be used for added richness.
For the Vegetables
- Ripe Tomatoes (2, sliced) – Freshness and juiciness; use heirloom tomatoes for more flavor.
- Shredded Iceberg Lettuce (2 cups) – Adds crunch; other greens like romaine can substitute.
- Arugula (2 cups) – Offers peppery flavor; spinach can be used for a milder taste.
For the Finishing Touches
- Flaky Sea Salt – Enhances seasoning; regular salt can also work, albeit in a smaller quantity.
- Freshly Cracked Black Pepper – Adds spiciness; red pepper flakes can be used for a different flavor.
This classic Italian Picnic Sandwich is bound to become a highlight at your next gathering!
Step‑by‑Step Instructions for Italian Picnic Sandwich
Step 1: Prepare the Marinated Onions
Start by slicing the red onion thinly and mixing it in a bowl with high-quality olive oil, red wine vinegar, dried oregano, and kosher salt. Allow the onions to marinate for at least 30 minutes at room temperature. This process enhances their flavors, resulting in a tangy, delicious topping that complements the Italian Picnic Sandwich beautifully.
Step 2: Make the Spicy Mayo
In a medium bowl, combine mayonnaise and Calabrian chili paste, mixing until smooth and fully blended. This spicy mayo will add a creamy kick to your Italian Picnic Sandwich. Set it aside to allow the flavors to meld while you prep the other ingredients.
Step 3: Slice the Ciabatta Bread
Take a 12-14 inch ciabatta bread and carefully slice it in half lengthwise using a serrated bread knife. Ensure the cut is even to create a sturdy base for your ingredients. This crunchy exterior will provide an excellent texture for your Italian Picnic Sandwich.
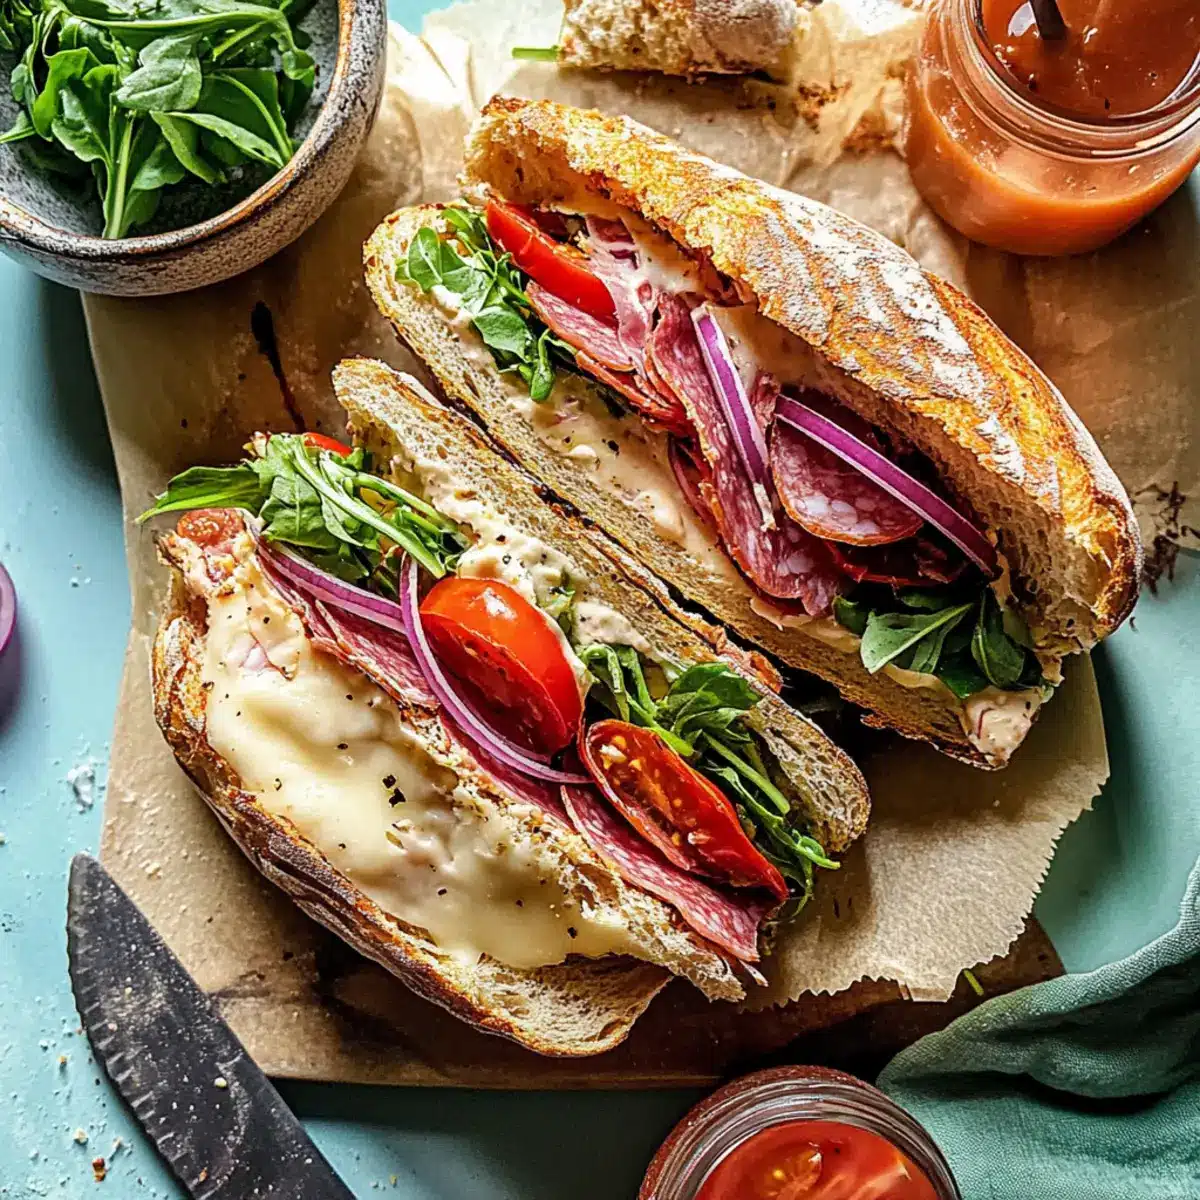
Step 4: Spread the Spicy Mayo
Generously spread the spicy mayo on both cut sides of the ciabatta. Make sure to cover the bread evenly, allowing the creamy, flavorful mixture to seep into the bread. This step is essential for adding moisture and flavor to your Italian Picnic Sandwich.
Step 5: Layer the Meats and Cheeses
Starting from the bottom half of the ciabatta, layer the provolone cheese, mortadella, capocollo, genoa salami, and soppressata evenly. Each meat adds a unique flavor, enhancing the delectable richness of the Italian Picnic Sandwich. Then, add slices of ripe tomatoes, finishing with a sprinkle of flaky sea salt and freshly cracked black pepper for seasoning.
Step 6: Add the Fresh Ingredients
Next, scatter the fresh mozzarella pieces over the meats, followed by a generous layer of shredded iceberg lettuce and arugula. Drizzle a little of the marinated onion mixture over the greens to elevate the taste. This will contribute a fresh and crunchy texture to your Italian Picnic Sandwich, balancing the richness of the meats.
Step 7: Close and Cut the Sandwich
Gently place the top half of the ciabatta back on the assembled sandwich, pressing down slightly to compress it. With a sharp knife, cut the sandwich into 6-8 pieces for easy serving. Each piece should show off the colorful, inviting layers of your Italian Picnic Sandwich.
Step 8: Wrap for the Picnic
If packing for a picnic, wrap the cut Italian Picnic Sandwich pieces in wax paper, followed by plastic wrap. This will help keep the sandwich fresh and prevent any spills. Your delicious creation is now ready to be enjoyed in the great outdoors with friends and family!

What to Serve with Italian Picnic Sandwich
Each bite of this sandwich is a journey through Italian flavors, so let’s elevate your meal with perfect pairings that will delight your taste buds!
-
Crispy Potato Chips: Offers a satisfying crunch that contrasts beautifully with the soft sandwich.
-
Creamy Coleslaw: The cool, creamy texture complements the spicy flavor, adding a refreshing touch to the meal.
-
Italian Pasta Salad: A classic side that mirrors the Italian theme while providing a fresh, tangy flavor that pairs perfectly with the sandwich.
-
Garlic Bread: The buttery, garlicky goodness perfectly balances the richness of the meats and cheeses.
-
Fruit Salad: A vibrant mix of seasonal fruits adds a refreshing sweetness, lightening up the overall richness.
-
Balsamic Vinegar Drizzle: A simple yet effective way to enhance your sandwich’s flavors; drizzle over a salad or alongside vegetables.
-
Aromatic Herbal Tea: A soothing drink to accompany your meal, cleansing the palate between bites.
-
Limoncello: This Italian digestif’s citrusy notes are ideal for winding down after the delightful chaos of flavors.
Make Ahead Options
These Italian Picnic Sandwiches are perfect for meal prep enthusiasts! You can prepare the marinated onions and spicy mayo up to 24 hours in advance, allowing the flavors to meld beautifully. Simply marinate the onions and refrigerate them in an airtight container, and blend the spicy mayo to store in the fridge as well. The sandwich layers can also be prepped, with meats and cheeses sliced and stored separately for up to 3 days; just keep them in the fridge to maintain freshness. When you’re ready to enjoy, assemble the sandwich shortly before serving to ensure the ciabatta stays crunchy and the fresh veggies remain crisp. This way, you’ll have a delightful, hearty meal ready to impress with minimal effort!
Expert Tips for Italian Picnic Sandwich
-
Onion Marination Time: Marinate the onions for at least 30 minutes to get the best flavor and reduce sharpness. Don’t rush this step!
-
Deli Counter Help: Ask for deli-counter slicing for your meats and cheeses. A thickness of 0.5 inches for meats and 1-1.5 inches for cheeses works best for this Italian Picnic Sandwich.
-
Layering Strategy: Start layering with meat first, then add cheeses and veggies. This order prevents soggy bread, ensuring a delightful crunch in each bite.
-
Freshness Tip: Use fresh ingredients, especially tomatoes and greens, for a vibrant taste. Heirloom tomatoes and fresh mozzarella elevate your Italian Picnic Sandwich.
-
Transporting Made Easy: When packing for a picnic, wrap the sandwich tightly in wax paper, then plastic wrap, to maintain its freshness and prevent messes.
Italian Picnic Sandwich Variations
Feel free to explore new twists on this delightful sandwich—a world of flavors awaits!
- Alternate Meats: Swap soppressata for prosciutto for a richer, more savory bite. You’ll discover how versatile your proteins can be!
- Cheese Choices: Use sharp provolone or creamy burrata instead of traditional mozzarella for a luxurious twist that excites the palate.
- Bread Types: Try focaccia or a nutty multigrain loaf to lend a unique texture while keeping the sandwich hearty and satisfying.
- Heat Level: Switch Calabrian chili paste for milder sriracha if you’re looking for less spice, ensuring everyone can enjoy this culinary creation.
- Veggie Boost: Add roasted red peppers or sun-dried tomatoes for a sweet burst, enhancing the freshness of your Italian Picnic Sandwich.
- Herb Infusion: Mix fresh basil or parsley into your marinated onions for an aromatic lift that elevates the overall flavor profile.
- Greens Galore: Experiment with mixed greens instead of iceberg and arugula for a different crunch and a variety of textures.
- Flavor Variation: Make it Italian-inspired by adding a touch of pesto to the mayonnaise, creating a deliciously herbaceous spread that complements the sandwich beautifully.
These variations not only add a personal touch to your Italian Picnic Sandwich but can also introduce a delightful range of flavors. For more delicious ideas, don’t forget to check out my Italian Beef Sandwich for another crowd-pleaser! Enjoy the adventure of customization!
How to Store and Freeze Italian Picnic Sandwich
Fridge: Store leftover pieces in an airtight container for up to 3 days to maintain freshness. This helps keep your Italian Picnic Sandwich tasting its best.
Freezer: If you want to save some for later, wrap whole sandwich portions tightly in plastic wrap and then aluminum foil. They can be frozen for up to 3 months.
Reheating: To enjoy your Italian Picnic Sandwich warm, thaw in the fridge overnight and reheat in the oven at 350°F (175°C) for about 10-15 minutes, until heated through.
Wrap Guidance: Always wrap the sandwich securely to prevent freezer burn, keeping those delicious flavors intact!

Italian Picnic Sandwich Recipe FAQs
How do I select ripe tomatoes for the sandwich?
Choose tomatoes that are vibrant in color, firm, and slightly soft to the touch. Look for those with smooth skins free of blemishes or dark spots. Heirloom tomatoes are a fantastic option as they bring amazing flavor! A tip I recommend is to gently press the tomato; if it gives slightly, it’s ripe and ready for slicing.
What is the best way to store leftover Italian Picnic Sandwich?
Store any leftover pieces in an airtight container in the refrigerator for up to 3 days. This helps keep the bread from becoming soggy while retaining the delicious flavors of the sandwich. If you’re planning to enjoy the leftovers later, you can wrap individual portions in plastic wrap to keep them fresh and avoid air exposure.
Can I freeze the Italian Picnic Sandwich?
Absolutely! To freeze, wrap the whole sandwich portions tightly in plastic wrap and then aluminum foil to prevent freezer burn. These can be stored in the freezer for up to 3 months. When you’re ready to enjoy one, simply thaw it in the refrigerator overnight, then reheat in the oven at 350°F (175°C) for about 10-15 minutes until warmed all the way through.
What should I do if I have allergies to certain ingredients?
If you have any allergies, make sure to substitute accordingly! For example, if you’re allergic to dairy, try using dairy-free cheese alternatives or skip the cheese altogether. Additionally, you can replace the deli meats with roasted vegetables or chickpea salad for a delightful vegetarian option while still enjoying the Italian flavors.
Why are my marinated onions too strong?
If your marinated onions taste too strong, try rinsing them lightly under cold water after marinating, then pat them dry. This will remove some sharpness while still retaining the flavor. If you prefer a milder taste, you could also opt to soak them in cold water for about 10-15 minutes before marinating—this will help tone down their robust flavor.
How long can I keep the marinated onions in the fridge?
Marinated onions can last in the fridge for about 1 week when stored in an airtight container. Just ensure that they’re fully submerged in the marinade to keep them fresh. They can actually get better over time as they soak up the vinegar and oil flavors!
Mouthwatering Italian Picnic Sandwich to Wow Your Guests
Ingredients
Equipment
Method
- Prepare the Marinated Onions: Start by slicing the red onion thinly and mixing it in a bowl with high-quality olive oil, red wine vinegar, dried oregano, and kosher salt. Allow the onions to marinate for at least 30 minutes at room temperature.
- Make the Spicy Mayo: In a medium bowl, combine mayonnaise and Calabrian chili paste, mixing until smooth. Set aside.
- Slice the Ciabatta Bread: Slice the ciabatta bread in half lengthwise using a serrated knife.
- Spread the Spicy Mayo: Generously spread the spicy mayo on both cut sides of the ciabatta.
- Layer the Meats and Cheeses: Starting from the bottom half, layer provolone cheese, mortadella, capocollo, genoa salami, and soppressata. Add ripe tomato slices, flaky sea salt, and black pepper.
- Add the Fresh Ingredients: Scatter fresh mozzarella pieces over the meats, followed by shredded iceberg lettuce and arugula.
- Close and Cut the Sandwich: Place the top half of the ciabatta back on the assembled sandwich, pressing down slightly. Cut into 6-8 pieces.
- Wrap for the Picnic: Wrap the cut sandwich pieces in wax paper and then plastic wrap for easy transport.
Leave a Reply