
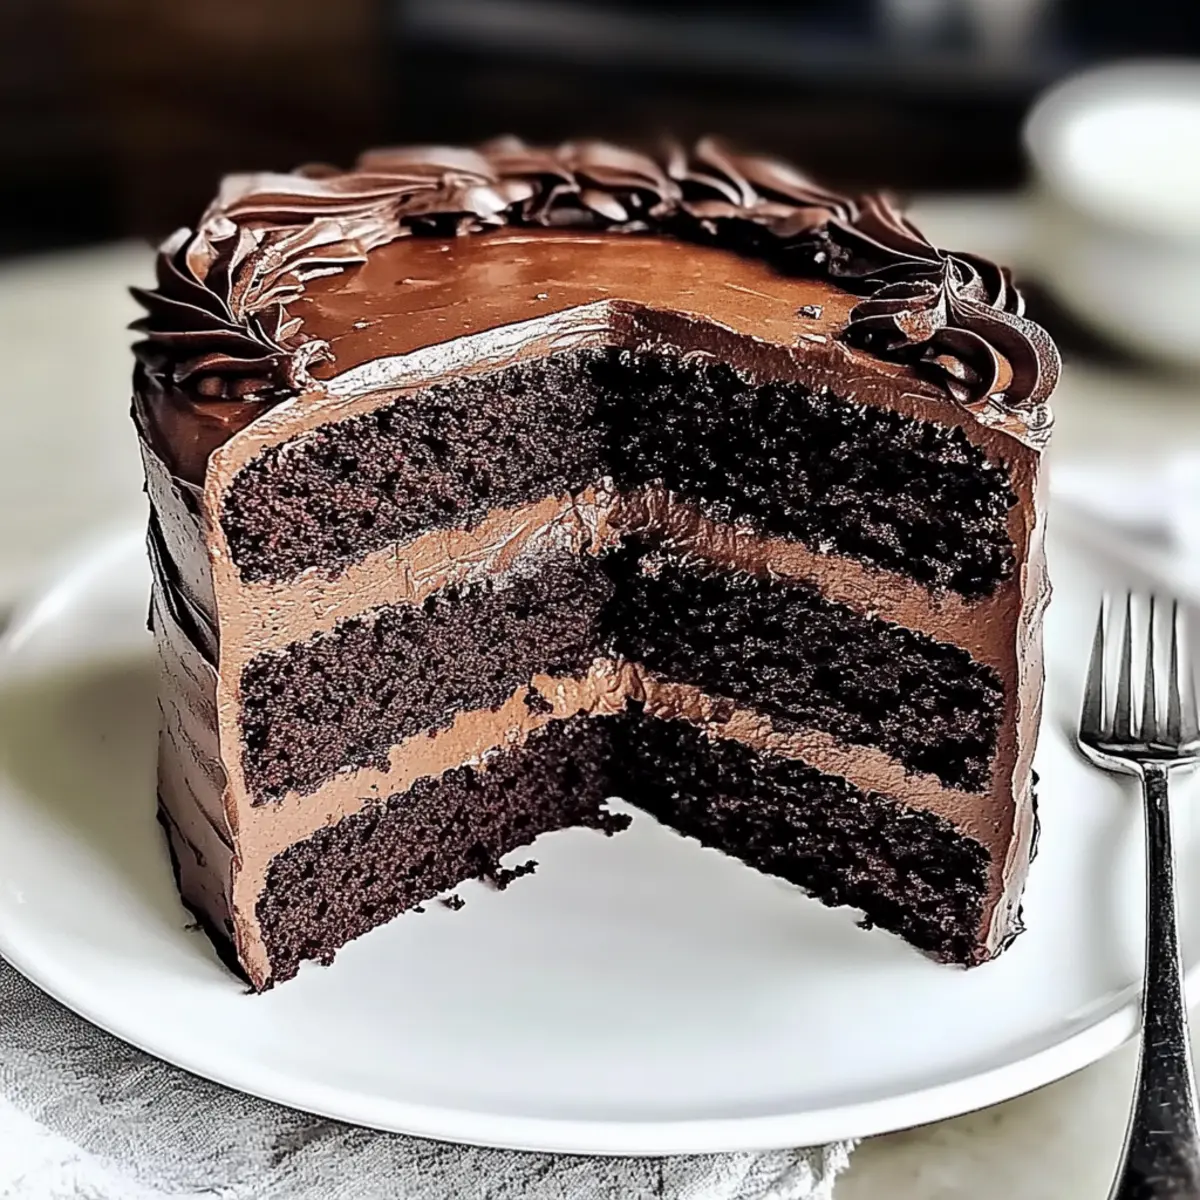
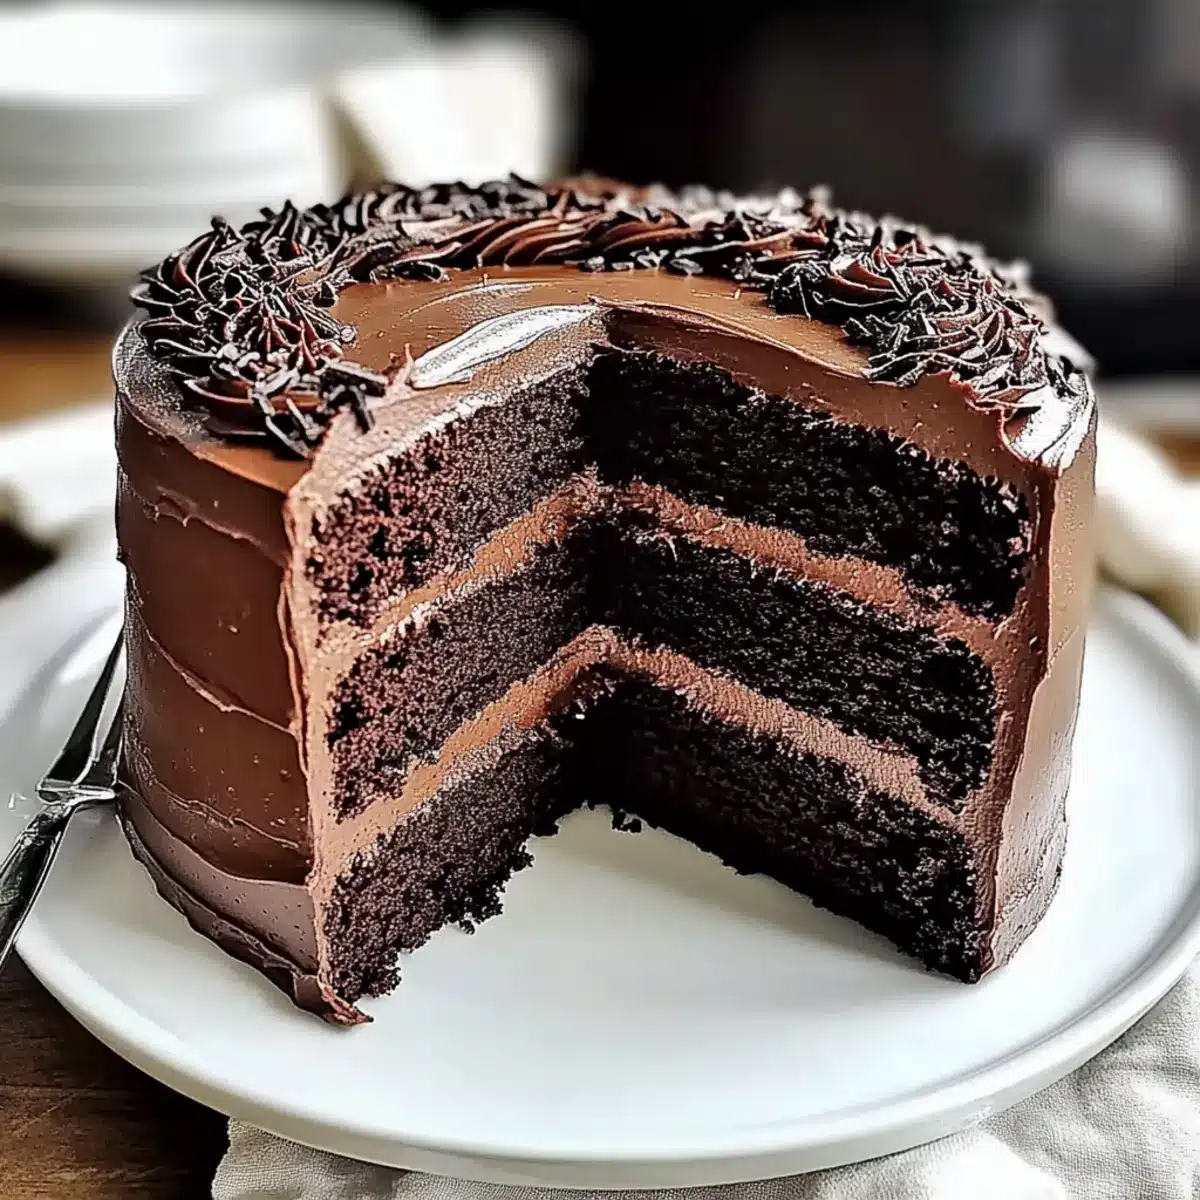
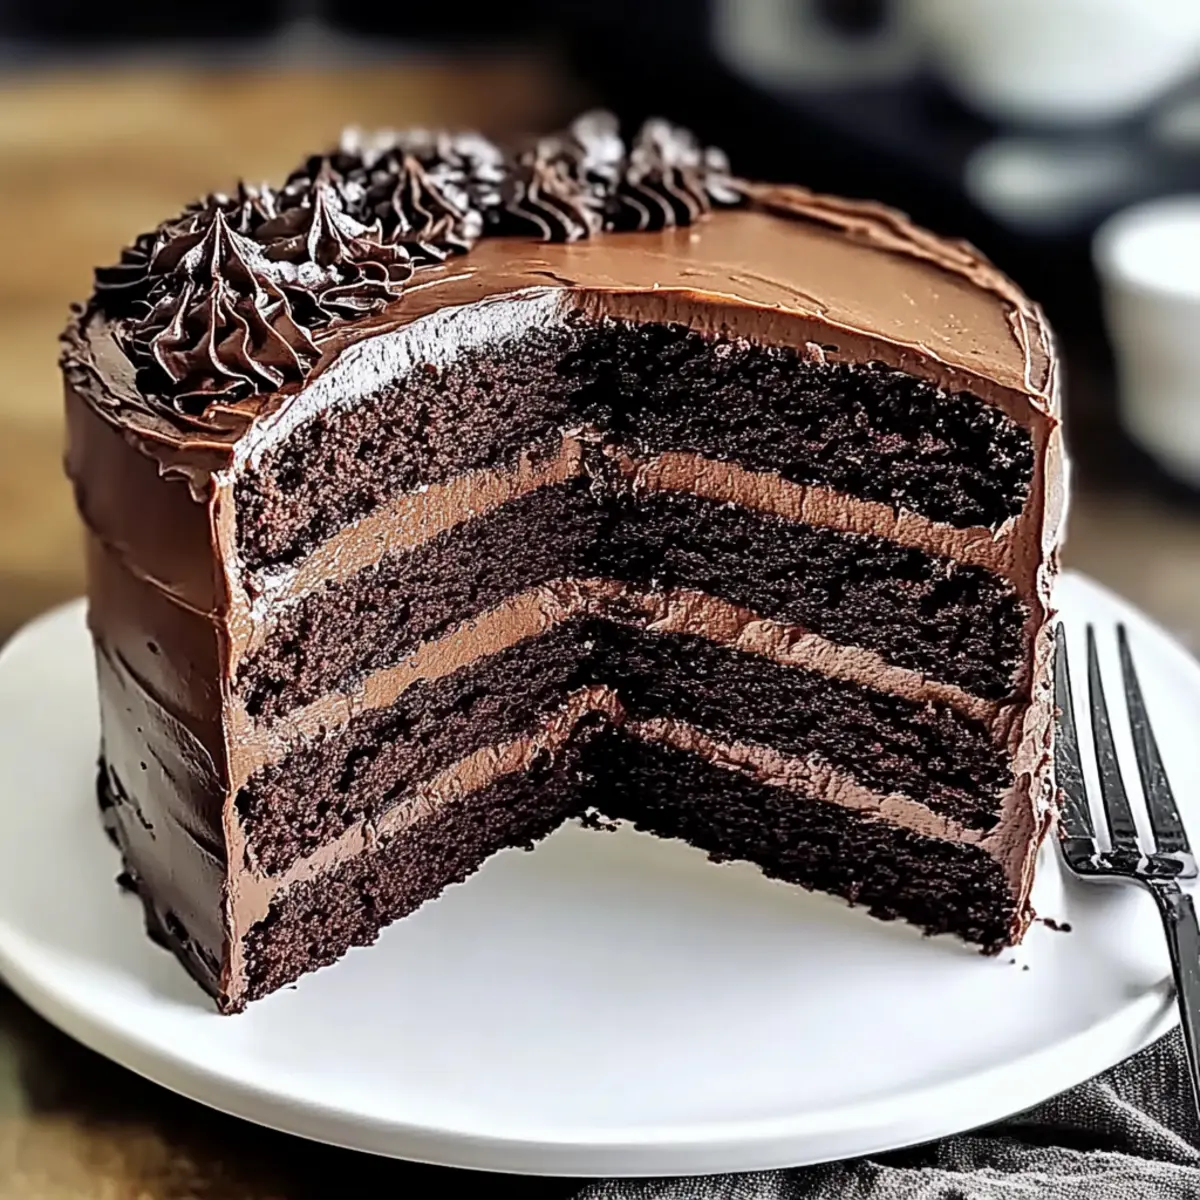
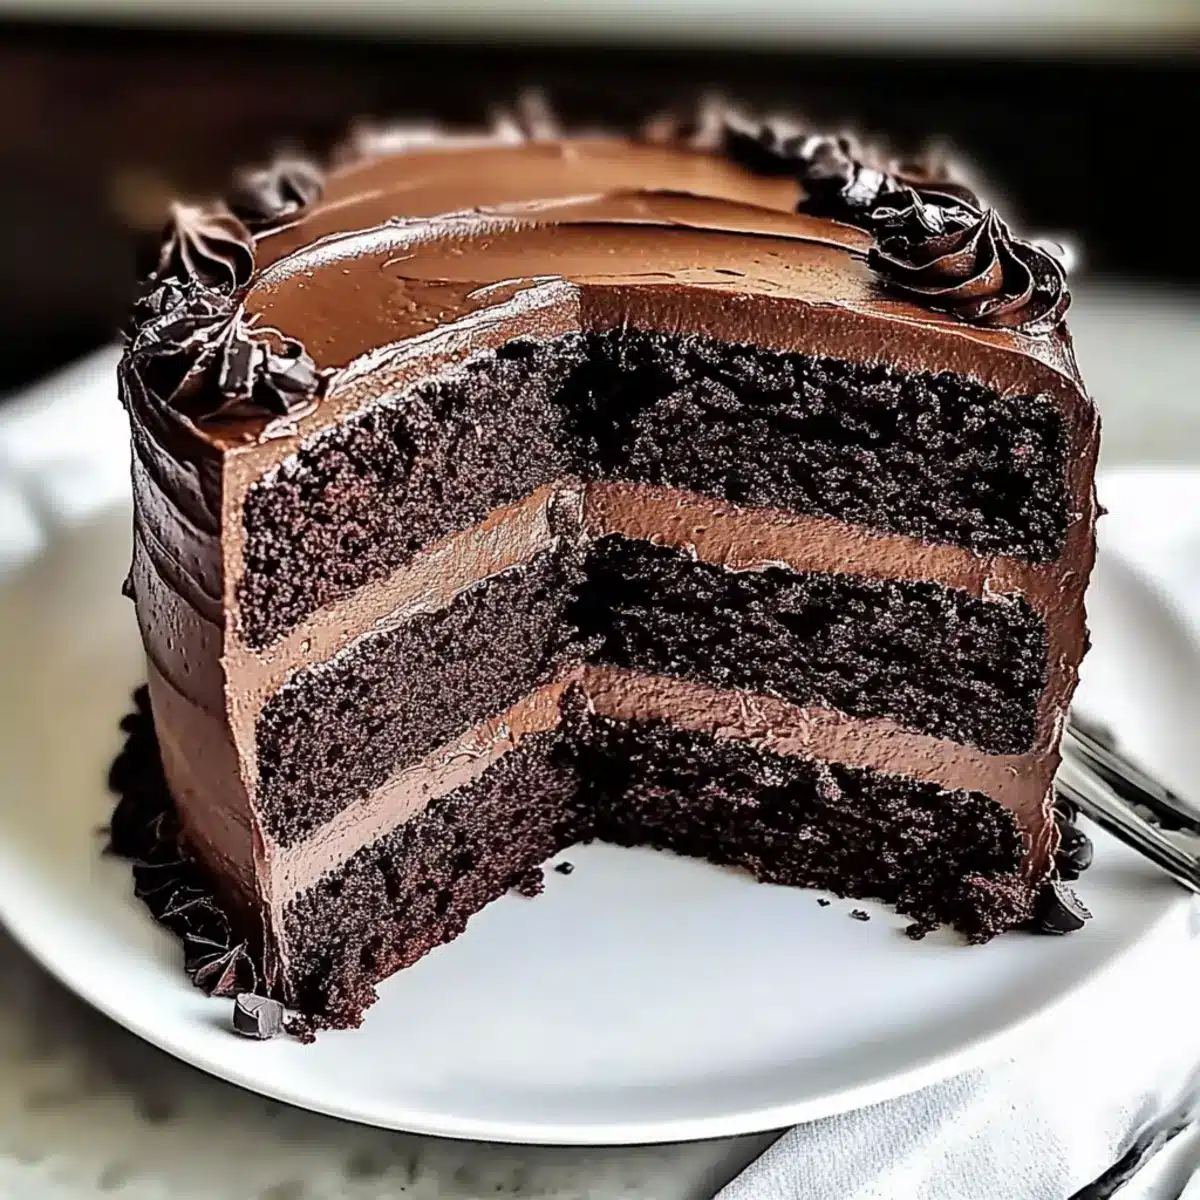
As I stood in my kitchen, the rich scent of coffee mingling with chocolate started to weave its magic. That’s when I realized my Chocolate Espresso Cake was destined to become more than just a dessert—it was the centerpiece of my weekend gatherings. This decadent treat is not only delightfully fudgy and moist but also incredibly simple to make, ensuring that even novice bakers can impress their friends and family with minimal effort. The balance of robust coffee and luxurious chocolate will have everyone swooning, making it the perfect solution for those tired of quick takeout options. Ready to elevate your baking game and create something extraordinary? Let’s dive into this delightful recipe together!
Why is this cake a must-try?
Indulgence Awaiting: The Chocolate Espresso Cake brings together the best of both worlds—intense chocolate flavor complemented by a hint of coffee. Simplicity Redefined: With easy steps, even the busiest home cooks can create this showstopper. Versatile Pairing: This cake perfectly pairs with Decadent Chocolate Strawberry or a scoop of ice cream, elevating any occasion. Moist and Fudgy: Expect a rich, fudgy texture that’s simply irresistible. Impress Your Guests: Your friends and family will think you’re a pro baker, making it a fantastic option for gatherings.
Chocolate Espresso Cake Ingredients
For the Cake
- All-purpose flour – Provides structure and stability to the cake; you can use whole wheat flour for a healthier option.
- Cocoa powder – Adds rich chocolate flavor; Dutch-processed cocoa offers a milder taste if preferred.
- Dark brown sugar – Contributes moisture and depth of flavor; light brown sugar can be used for a lighter sweetness.
- Granulated sugar – Sweetens the cake and balances flavors beautifully.
- Baking powder & Baking soda – Essential for leavening, helping the cake rise to perfection.
- Salt – Enhances sweetness and overall flavor.
- Eggs – Act as a binder, adding moisture and richness.
- Vegetable oil – Keeps the cake moist; feel free to substitute with melted butter for a richer flavor.
- Vanilla extract – Enhances and deepens the overall flavor profile.
- Hot coffee – Intensifies the chocolate flavor and activates dry ingredients for a delightful combination.
For the Frosting
- Heavy cream – Creates a silky texture for the frosting, making it luxuriously smooth.
- Sugar (for frosting) – Sweetens and balances the rich chocolate flavors beautifully.
- Chocolate (dark and semi-sweet) – Forms the rich base of the frosting, adding indulgent flavor.
- Instant coffee granules – Delivers an extra coffee flavor, perfectly complementing the cake.
- Water – Helps dissolve coffee granules for a wonderfully smooth frosting experience.
Now that you’ve gathered everything you need, you’re on your way to creating a Chocolate Espresso Cake that’s sure to impress!
Step‑by‑Step Instructions for Chocolate Espresso Cake
Step 1: Prepare Frosting
Begin by chopping the dark and semi-sweet chocolate into small pieces and placing them in a heatproof bowl. In a saucepan, heat heavy cream and sugar over medium heat until the sugar dissolves and the cream is just about to boil. Pour the hot cream over the chocolate and instant coffee granules. Let it sit for a minute before whisking until smooth. Chill the mixture in the fridge for 30 minutes to thicken.
Step 2: Make Cake Batter
Preheat your oven to 350°F (175°C) and grease two 9-inch round cake pans with a little vegetable oil or butter. In a large mixing bowl, whisk together all-purpose flour, cocoa powder, baking powder, baking soda, and salt until evenly combined. In another bowl, mix the dark brown sugar, granulated sugar, eggs, vegetable oil, vanilla extract, and hot coffee. Combine the wet and dry ingredients gently until just mixed for your Chocolate Espresso Cake batter.
Step 3: Bake the Cake
Divide the rich chocolate espresso cake batter evenly between the two prepared pans. Bake in the preheated oven for 25-30 minutes, or until a toothpick inserted into the center comes out clean with a few crumbs. Once done, remove the pans from the oven and cool them on a wire rack for about 10 minutes. Carefully turn the cakes out of the pans and let them cool completely before frosting.
Step 4: Prepare Coffee Soak
While the cakes cool, prepare the coffee soak. In a small bowl, mix together boiling water and instant coffee granules until completely dissolved. Allow this mixture to cool to room temperature; this soak will help enhance the flavor of your Chocolate Espresso Cake layers without making them soggy.
Step 5: Assemble Cake
Once the cake layers are completely cool, use a serrated knife to slice each layer in half horizontally, creating four equal layers. Place one layer on a serving plate and generously brush it with the prepared coffee soak. Spread a layer of the chilled chocolate frosting over the soaked layer and repeat this process for the next two layers, finishing with the final layer on top.
Step 6: Crumb Coat
After stacking all your layers, apply a thin layer of frosting all over the outer sides and top of the cake, known as the crumb coat. This helps seal in any loose crumbs. Refrigerate the cake for 15-20 minutes until the crumb coat is set, which will make the final frosting smoother and cleaner on your Chocolate Espresso Cake.
Step 7: Final Frosting Application
Once the crumb coat is set, remove the cake from the refrigerator. Use the remaining frosting to generously frost the top and sides of the cake, smoothing it out with a spatula or a cake scraper. Decorate as desired, perhaps with chocolate shavings or coffee beans, and admire your beautifully crafted Chocolate Espresso Cake before slicing and serving!
What to Serve with Chocolate Espresso Cake?
Indulge your senses further by pairing this rich, fudgy cake with delightful companions that enhance its deep flavors.
-
Velvety Ice Cream: The creaminess of vanilla or coffee ice cream contrasts beautifully with the cake’s dense texture, creating a perfect balance.
-
Fresh Berries: Bright and tart, strawberries or raspberries add a refreshing touch, enhancing the overall richness of the dessert.
-
Whipped Cream: Lightly sweetened whipped cream complements the heavy layers of chocolate and coffee, making every bite even more luxurious.
-
Espresso or Coffee: A cup of freshly brewed espresso or a smooth coffee brings out the cake’s coffee notes, creating a wonderful harmony.
-
Chocolate Ganache: For the true chocolate lover, drizzling warm chocolate ganache over each slice adds an extra layer of decadence.
-
Chocolate-Dipped Strawberries: These fancy treats not only look stunning but also echo the cake’s rich chocolate flavors, perfect for special occasions.
-
Coconut Macaroons: Their chewy texture and sweetness provide a delightful contrast to the fudgy cake while introducing a hint of tropical flair.
-
Dark Chocolate Shavings: Sprinkling shavings on top not only elevates the presentation but adds a touch of elegant bitterness that pairs wonderfully with the sweetness.
-
Nutty Biscotti: Crunchy, almond-flavored biscotti provide a satisfying texture contrast and pair well with a glass of dessert wine.
These pairings can turn a simple dessert into a remarkable occasion, ensuring your Chocolate Espresso Cake is the star of the show!
How to Store and Freeze Chocolate Espresso Cake
Fridge: Keep your Chocolate Espresso Cake in an airtight container in the fridge for up to one week. This will maintain its moisture and delicious flavor.
Freezer: To freeze, wrap individual slices tightly in plastic wrap, then store in a freezer-safe bag or container for up to three months.
Thawing: When ready to enjoy, thaw the slices in the refrigerator overnight or at room temperature for a few hours before serving.
Reheating: For a warm treat, gently reheat slices in the microwave for 10-15 seconds or in a 350°F (175°C) oven for about 5-10 minutes.
Expert Tips for Chocolate Espresso Cake
-
Quality Ingredients: Use high-quality chocolate and fresh coffee for an exceptional flavor in your Chocolate Espresso Cake. The better the ingredients, the richer the taste!
-
Mix Gently: Avoid overmixing the batter; combine wet and dry ingredients until just incorporated. This will ensure a light and tender cake, not dense or gummy.
-
Cool Completely: Ensure all cake layers are completely cool before frosting. If warm, the frosting may melt, resulting in a mess rather than a beautifully frosted cake.
-
Coffee Soak Caution: Lightly brush the coffee soak on the cake layers to avoid oversaturation; you want them moist, not soggy.
-
Don’t Skip the Crumb Coat: The crumb coat is vital for a professional-looking finish. It prevents crumbs from appearing in the final layer of frosting, making your Chocolate Espresso Cake look flawless!
Chocolate Espresso Cake Variations
Feel free to put your own twist on this delicious recipe and make it uniquely yours!
-
Gluten-Free: Use a gluten-free all-purpose blend instead for a cake everyone can enjoy without the gluten.
-
Dairy-Free: Swap heavy cream for coconut cream and choose dairy-free chocolate to cater to lactose sensitivities while keeping the flavors intact.
-
Flavored Coffee: Experiment with different flavored coffees, like hazelnut or vanilla, to give the cake an exciting new dimension. Each flavor twist can lead to a delightful surprise for your taste buds!
-
Nutty Addition: Incorporate finely chopped nuts like walnuts or hazelnuts into the batter for added texture and a nutty richness. They pair beautifully with the deep flavors of chocolate.
-
Whipped Frosting: For a lighter frosting, mix whipped cream with your chocolate frosting to create a fluffy, airy finish. This will add a fun twist to the overall texture!
-
Mocha Version: Add a tablespoon of instant espresso powder directly into the cake batter for an even richer coffee flavor that will have anyone who loves coffee swooning.
-
Zest of Citrus: Brighten the flavors by adding a teaspoon of orange or lemon zest to the batter. The citrus notes will create an unexpected but delightful contrast to the deep chocolate.
-
Personalize the Toppings: Top with fresh berries or a dusting of powdered sugar instead of the frosting for a charming and refreshing alternative, perfect for a lighter dessert experience.
These variations ensure your Chocolate Espresso Cake meets your specific cravings and dietary needs, making it versatile for any occasion. Also, consider pairing it with a side of Decadent Chocolate Strawberry for an extra treat during your next gathering!
Make Ahead Options
These Chocolate Espresso Cake preparations make it a breeze for busy home cooks to impress their loved ones! You can prepare the cake layers up to 3 days in advance by baking them, cooling completely, and then wrapping in plastic wrap to refrigerate. Additionally, the frosting can be made ahead and stored in an airtight container in the fridge for up to 24 hours. Just give it a gentle re-whip before spreading. When ready to serve, reassemble the layers with the coffee soak and frost as directed. This way, you keep everything tasting just as delicious while saving precious time!
Chocolate Espresso Cake Recipe FAQs
How do I choose the right coffee for my Chocolate Espresso Cake?
Absolutely! For the best flavor, I recommend using a rich, dark roast coffee that you enjoy drinking. Freshly brewed coffee works wonders, as it enhances the chocolate notes beautifully. If you prefer a milder flavor, you can opt for medium roast, but ensure it’s still strong enough to complement the chocolate.
How should I store my Chocolate Espresso Cake?
To keep your Chocolate Espresso Cake fresh, store it in an airtight container in the fridge for up to one week. This method preserves its moistness and flavor. If you’re not consuming it all right away, consider freezing slices to enjoy later!
Can I freeze the Chocolate Espresso Cake?
Yes, you can! To freeze, wrap individual slices tightly in plastic wrap and then place them in a freezer-safe container or bag. This will keep them fresh for up to three months. To thaw, simply move them to the fridge the night before or allow them to sit at room temperature for a few hours.
What if my cake sinks in the middle?
Very! A sunken middle can happen due to a few reasons. It might be underbaked, so double-check your oven’s temperature with an oven thermometer and always do the toothpick test before removing from the oven. Another reason could be overmixing your batter; mix gently until just combined for a light texture.
Is this recipe suitable for those with nut allergies?
Absolutely! This Chocolate Espresso Cake recipe does not include any nuts, making it safe for those with nut allergies. However, always ensure that the ingredients you choose, especially chocolate and baking powder, are produced in nut-free facilities to avoid cross-contamination.
What’s the best way to enjoy leftover cake?
Enjoying your leftover Chocolate Espresso Cake can be a treat! I often serve it with a dollop of whipped cream or a scoop of vanilla ice cream for added indulgence. You can also pair it with a drizzle of espresso or chocolate sauce for extra flair!
Indulge in Rich Chocolate Espresso Cake Bliss Today
Ingredients
Equipment
Method
- Chop chocolate into small pieces and place in a heatproof bowl. Heat cream and sugar until dissolved, then pour over chocolate and instant coffee granules. Whisk until smooth and chill for 30 minutes.
- Preheat oven to 350°F (175°C). Grease two 9-inch round cake pans. In a bowl, whisk flour, cocoa powder, baking powder, baking soda, and salt. In another bowl, mix brown sugar, granulated sugar, eggs, oil, vanilla, and hot coffee. Combine wet and dry ingredients until just mixed.
- Divide batter into the prepared pans and bake for 25-30 minutes, until a toothpick comes out clean. Cool in pans for 10 minutes before turning out onto a wire rack to cool completely.
- To prepare coffee soak, mix boiling water and instant coffee granules until dissolved. Allow to cool. This will enhance the flavor of the cake layers.
- Once the cakes are cool, slice each layer in half horizontally to create four layers. Brush the first layer with coffee soak, spread frosting, and repeat for the next two layers; place the final layer on top.
- Apply a thin crumb coat of frosting over the cake and refrigerate for 15-20 minutes until set. This provides a smooth finish for the final frosting layer.
- After the crumb coat is set, frost the top and sides of the cake with remaining frosting. Decorate as desired and serve.
Leave a Reply