
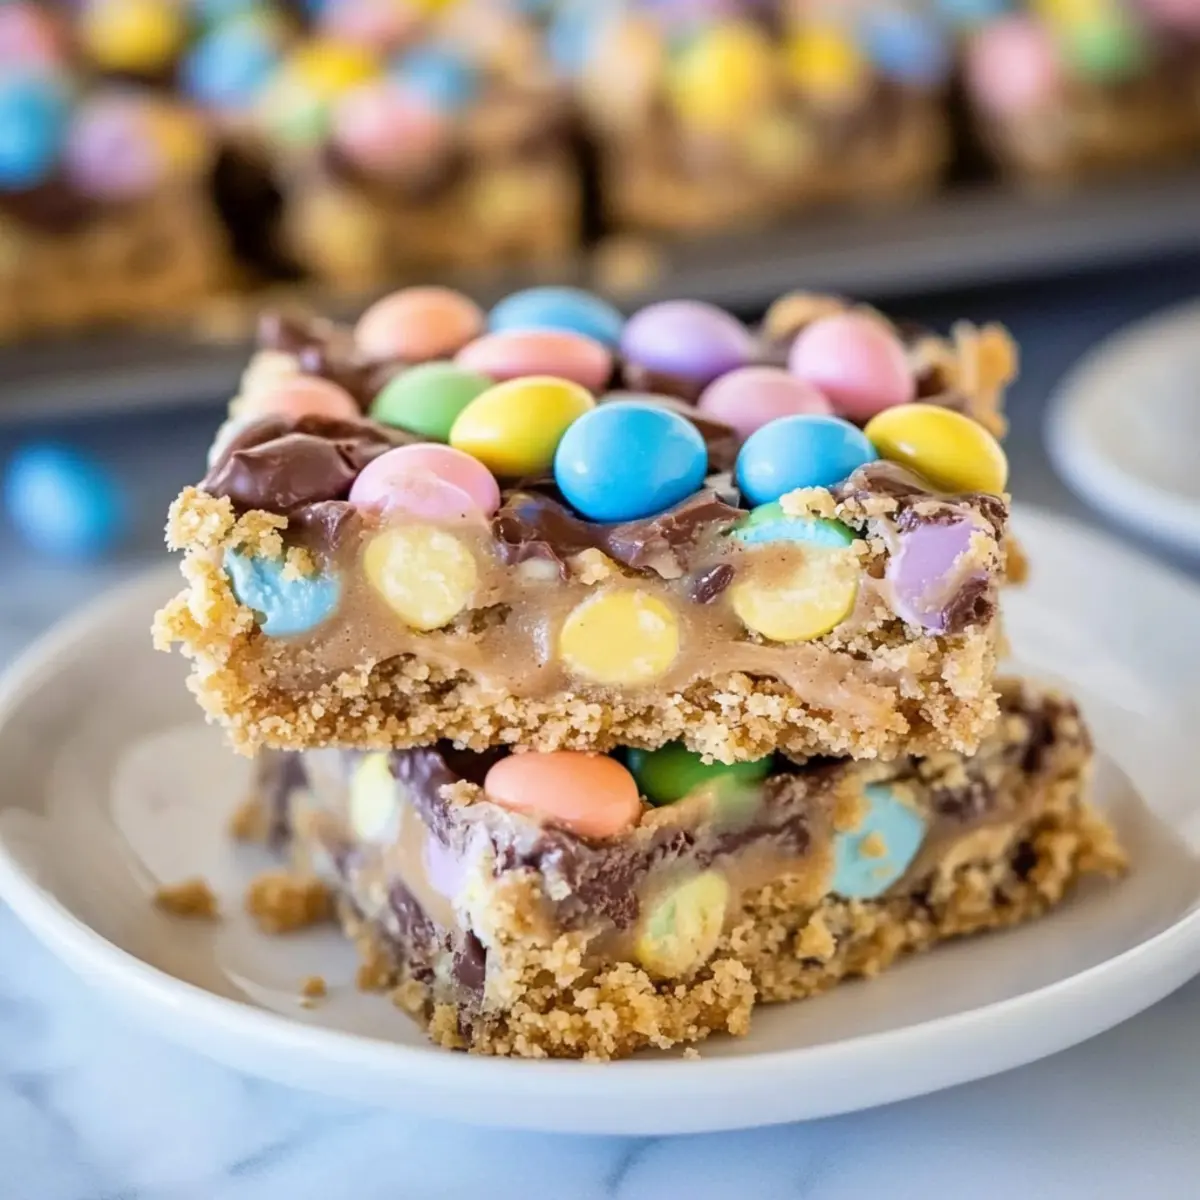
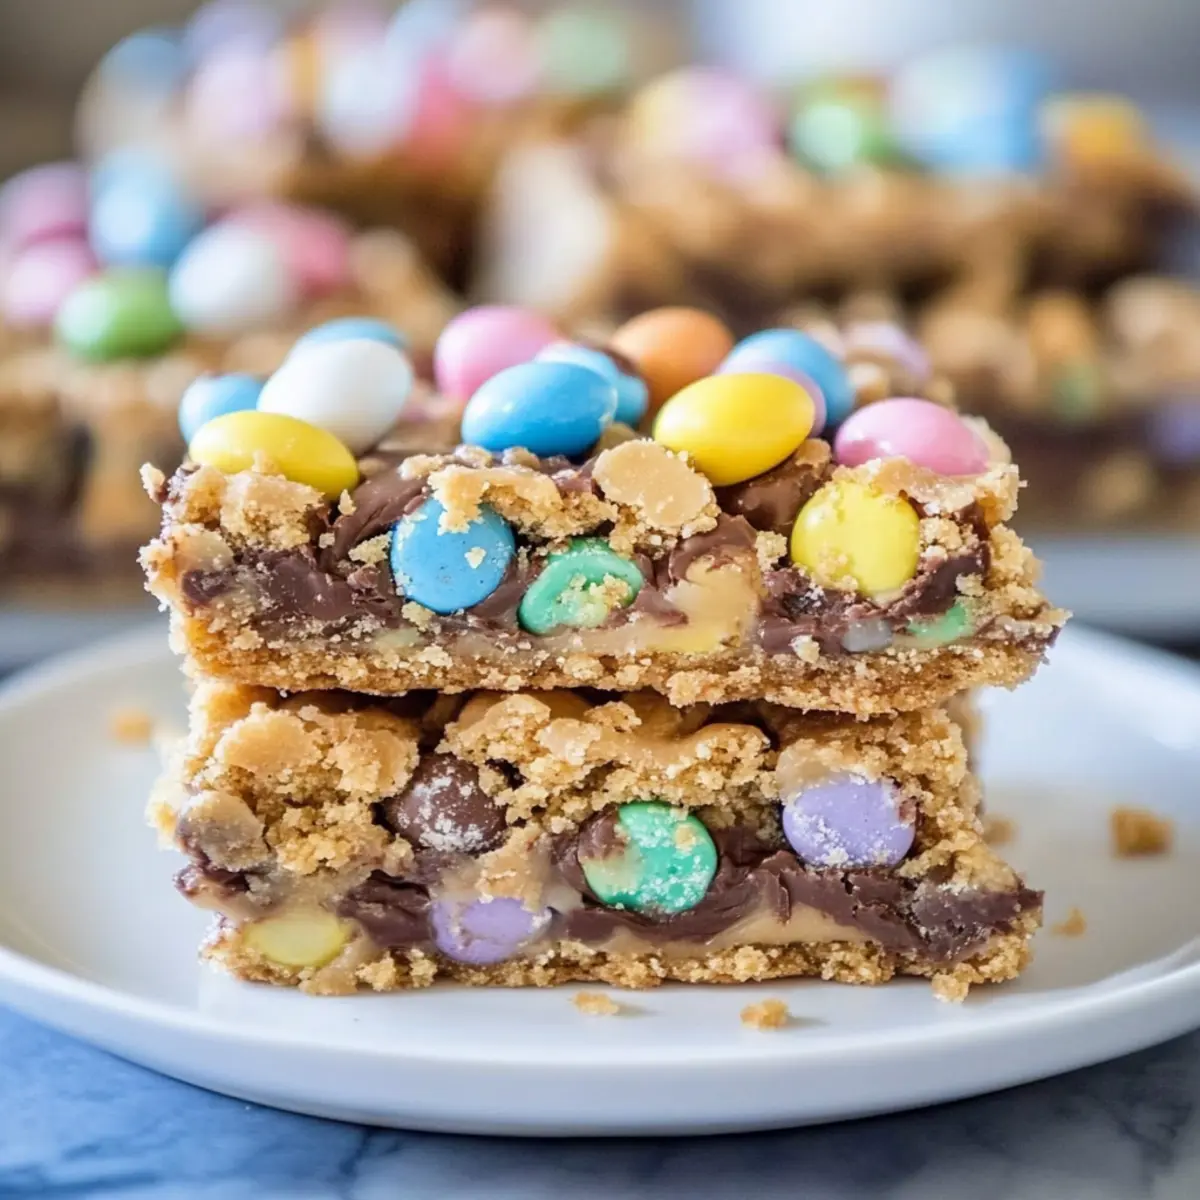
The unmistakable scent of peanut butter wafted through the kitchen as I prepped for our Easter gathering, an exciting reminder that delights were on their way. Enter the Easter Magic Bars—a festive twist on those beloved cookie bars that captures the holiday spirit in every bite. With quick prep and a charm that appeals to both kids and adults alike, these bars are a celebration of flavor and color. Picture layers of graham crackers, creamy peanut butter, and vibrant holiday M&M’s all coming together to create a dessert that feels both effortless and impressive. Perfect for those hectic holiday moments, these bars promise to be a crowd-pleaser and a sweet highlight on any dessert table. Are you ready to elevate your Easter festivities? Let’s dive into this easy recipe that’s sure to be the talk of the day!
Why Are Easter Magic Bars So Special?
Irresistible Charm: These bars are packed with festive colors and irresistible flavors, making them perfect for any holiday gathering.
Quick to Prepare: With simple ingredients and easy steps, you’ll have a delightful treat ready in no time!
Family-Friendly: Kids love helping sprinkle the M&M’s and layering the ingredients, ensuring everyone feels a part of the fun.
Versatile and Fun: You can swap in different chocolates or add nuts and dried fruits for delightful variations to suit your taste. Make sure to try them with a warm Grilled Chicken Bowl in a festive meal!
Perfect for Sharing: These chewy bars are an instant hit, making them ideal for potlucks, parties, or simply treating your family.
Prepare to impress with these vibrant Easter Magic Bars that turn any gathering into a celebration of sweetness!
Easter Magic Bars Ingredients
For the Base
- Graham Cracker Crumbs – Provides the crust and sweetness; swap with gluten-free options for a suitable alternative.
- Butter – Adds richness and binds the crust; coconut oil works well for a dairy-free choice.
For the Layers
- Old-Fashioned Oats – Contributes a chewy texture; use rolled oats as a delicious substitute.
- Semi-Sweet Chocolate Chips – Delivers sweetness; dark chocolate chips can enhance the flavor profile.
- Peanut Butter Chips – Offers a creamy, nutty essence; try almond butter bits for a different twist.
- Sweetened Condensed Milk – Binds the ingredients together; thick coconut milk can be a dairy-free substitute.
For the Festive Touch
- Easter M&M’s – Adds colorful crunch; any chocolate candy works if Easter M&M’s aren’t available.
These Easter Magic Bars promise joy in every bite, so gather your ingredients and let the magic happen!
Step‑by‑Step Instructions for Easter Magic Bars
Step 1: Preheat the Oven
Begin by preheating your oven to 350°F (175°C). This temperature ensures that your Easter Magic Bars bake evenly and develop that perfectly golden-brown crust. Prepare a 13×9 inch baking pan by lightly greasing it or lining it with parchment paper, making for easy removal once the bars are baked and cooled.
Step 2: Make the Crust
In a mixing bowl, combine graham cracker crumbs with melted butter, stirring until well blended. The mixture should resemble wet sand and hold together. Spread this crust mixture evenly across the bottom of your prepared baking pan, pressing down firmly with your hands or the bottom of a measuring cup to create a solid base for your Easter Magic Bars.
Step 3: Layer the Oats and Chips
Evenly sprinkle the old-fashioned oats over the crust, creating a wholesome layer. Next, distribute the semi-sweet and peanut butter chips atop the oats, making sure to cover the surface generously. This delightful layering not only adds flavor but also gives each bar a multitude of textures, creating a festive treat.
Step 4: Pour the Sweetened Condensed Milk
Slowly pour the sweetened condensed milk over the layered chips and oats, ensuring an even coating across all layers. The condensed milk is the magic binding agent that melds the flavors together while adding moisture and sweetness to your Easter Magic Bars. Make sure to cover all the ingredients well for a perfect bake.
Step 5: Add the M&M’s
Sprinkle a generous handful of Easter M&M’s over the top of the condensed milk layer, adding vibrant colors and crunch. Gently press them down so they adhere to the mixture slightly. These chocolate candies not only contribute to the visual appeal but also provide bursts of sweetness that complement the bars beautifully.
Step 6: Bake to Perfection
Place the pan in the preheated oven and bake for 22 to 25 minutes. Keep a close eye on the edges; they should turn golden brown while the center sets up perfectly. You’ll know your Easter Magic Bars are ready when they begin to bubble lightly around the edges—this signals that all ingredients are cohesively baked together.
Step 7: Cool and Slice
Once baked, carefully remove the pan from the oven and allow the bars to cool completely in the pan on a wire rack. This step is crucial for easy slicing later. Once cooled, use a sharp knife to cut them into squares or rectangles, revealing the colorful layers of your delicious Easter Magic Bars, ready to be enjoyed.
How to Store and Freeze Easter Magic Bars
Room Temperature: Store your Easter Magic Bars in an airtight container at room temperature for up to 4 days to keep them fresh and chewy.
Fridge: If you prefer a firmer texture, place them in the fridge for up to a week, ensuring they are well-wrapped to avoid drying out.
Freezer: For longer storage, freeze the bars in an airtight container or freezer bag for up to 2 months. Layer them with parchment paper to prevent sticking.
Reheating: To enjoy them warm, simply microwave individual bars for 10-15 seconds, bringing back that fresh-baked taste that everyone loves!
What to Serve with Easter Magic Bars
Indulge in the sweetness of the season by pairing these delightful treats with dishes that elevate your festive gathering.
-
Rich Ice Cream: Scoop a generous portion of vanilla or chocolate ice cream to complement the chewy texture of the bars. The cool creaminess adds a delightful contrast that everyone will love!
-
Fresh Fruit Salad: A vibrant mix of seasonal fruits like strawberries, blueberries, and kiwi offers a refreshing balance to the richness of the bars. Their natural sweetness perfectly harmonizes with the flavors, making for a colorful plate.
-
Coffee or Hot Cocoa: Sip on a warm cup of coffee or hot cocoa for the perfect cozy drink pairing. The warmth enhances the flavors of the bars while providing a comforting experience.
-
Whipped Cream: A dollop of homemade whipped cream will elevate your dessert experience. Its light and airy texture complements the dense, chewy bars, adding a luxurious touch to every bite.
-
Chocolate-Covered Strawberries: These sweet treats are a festive addition that pairs well with the bars. The combination of chocolate and fresh strawberries embodies the spirit of the holiday perfectly!
-
Nutty Granola: Crunchy granola sprinkled on top of a yogurt parfait can provide a fun side dish. It adds a textural contrast while echoing similar flavors present in the Easter Magic Bars.
-
Lemonade or Fruit Punch: Refreshing drinks like lemonade or a fruity punch can brighten up your dessert table, or consider making a playful Easter-themed punch to keep the festivities lively.
-
Mini Cupcakes: Adding mini cupcakes, perhaps with playful toppings, brings an element of fun to the dessert spread. They create a whimsical atmosphere and expand the variety of flavors available to guests.
These pairings will surely make your Easter Magic Bars shine alongside other delightful offerings!
Easter Magic Bars: Sweet Customization Ideas
Feel free to get creative with your Easter Magic Bars—there are so many delicious ways to make them your own!
- Gluten-Free: Use gluten-free graham crackers or cookie crumbs to create a base everyone can enjoy. It’s an easy swap that doesn’t compromise on taste.
- Nutty Delight: Replace peanut butter chips with almond butter bits for a different, yet equally decadent nutty flavor. You might even prefer it!
- Add Some Spice: Incorporate a dash of cinnamon or nutmeg into the crust for a warm, aromatic twist that adds depth to the sweetness.
- Fruitful Addition: Mix in chopped dried fruits like cranberries or cherries for a chewy texture that balances the rich chocolate flavors delightfully.
- Mixed Chocolate: Go wild and add a blend of dark chocolate and white chocolate chips together for a beautiful flavor contrast that’s oh-so-pretty.
- Seasonal Candies: Switch out the Easter M&M’s for Halloween or Christmas-themed chocolates, perfect for year-round enjoyment. Imagine those colors!
- Coconut Flakes: Sprinkle unsweetened coconut flakes on top for a tropical vibe, making each bite feel like a mini vacation. Pairing them with a warm Grilled Chicken Bowl can create a delightful feast!
- Heat it Up: For those who love a little kick, try adding a sprinkle of cayenne or chili powder to the chocolate layers for a surprising heat that enhances the sweet.
Explore these fun variations and discover new favorites when it comes to your enchanting Easter Magic Bars!
Expert Tips for Easter Magic Bars
- Pack Tightly: Ensure your graham cracker crust is packed tightly to provide a stable base for the bars. This prevents them from crumbling when sliced.
- Cool Completely: Allow the bars to cool fully in the pan before slicing. This helps them hold their shape and makes for cleaner cuts.
- Watch the Browning: Keep an eye on the baking time to avoid over-browning. The edges should be golden brown, but not burned.
- Use Fresh Ingredients: Fresh nuts, chips, and graham crackers will enhance the flavor of your Easter Magic Bars, making them even more delightful.
- Customize Your Toppings: Feel free to swap M&M’s for seasonal candies or add dried fruits and nuts for an exciting twist.
Make Ahead Options
These Easter Magic Bars are a fantastic choice for meal prep, allowing you to enjoy festive treats without the last-minute rush! You can prepare the base (graham cracker crust) up to 24 hours in advance by pressing it into the baking pan and refrigerating it. Additionally, layer the oats, chocolate chips, and peanut butter chips, covering tightly with plastic wrap, for up to 3 days. To maintain freshness and quality, refrigerate the unbaked layers, ensuring they don’t dry out. When it’s time to serve, pour the sweetened condensed milk over the layered ingredients, top with the Easter M&M’s, and bake as directed. This way, you’ll have beautifully baked Easter Magic Bars ready to impress with minimal effort!

Easter Magic Bars Recipe FAQs
How do I choose ripe ingredients for Easter Magic Bars?
Absolutely! For the best flavor in your Easter Magic Bars, choose quality ingredients. Look for fresh graham crackers without any stale spots; they should be crispy. If you’re adding nuts or dried fruits, ensure they’re fresh and not past their expiration date. Fresh chocolate chips will also make a noticeable difference in taste!
How should I store leftover Easter Magic Bars?
Very! Store your Easter Magic Bars in an airtight container at room temperature for up to 4 days. If you’d like them to last longer, you can refrigerate them for a week. Just be sure they are well-wrapped to prevent them from drying out.
Can I freeze Easter Magic Bars?
Of course! These bars freeze beautifully. Place the cooled bars in an airtight container or freezer bag, layering them with parchment paper to prevent sticking. They will stay fresh for up to 2 months in the freezer. When ready to enjoy, simply thaw them at room temperature or microwave individually for 10-15 seconds to warm them up.
What if my bars turn out too crumbly?
The more the merrier! To avoid crumbly bars, ensure your graham cracker crust is packed tightly and the sweetened condensed milk is evenly distributed across all layers, binding everything together. If they still crumble, they might need a touch more butter or condensed milk next time. Try adjusting these ingredients slightly for a firmer texture.
Can I substitute for allergies or dietary restrictions?
Definitely! For those with nut allergies, swap peanut butter chips with sunflower seed butter bits. You can use gluten-free graham cracker crumbs for a gluten-free option. For a dairy-free version, substitute regular butter with coconut oil and use thick coconut milk instead of sweetened condensed milk. Always read labels to ensure safety for dietary needs.
What other variations can I try with my Easter Magic Bars?
Sure thing! Feel free to experiment with different candies for different holidays. For instance, use pumpkin-shaped candies for Halloween or red and green candies for Christmas celebrations. Adding dried cranberries, coconut flakes, or nuts can enhance texture and flavor variation. The possibilities are endless!

Easter Magic Bars: Irresistibly Chewy & Colorful Treats
Ingredients
Equipment
Method
- Preheat your oven to 350°F (175°C) and prepare a 13x9 inch baking pan by greasing or lining it.
- Combine graham cracker crumbs with melted butter in a mixing bowl until well blended. Press firmly into the bottom of the baking pan.
- Evenly sprinkle old-fashioned oats over the crust, then add semi-sweet and peanut butter chips.
- Pour sweetened condensed milk over the layered chips and oats evenly.
- Sprinkle Easter M&M's on top and gently press them down.
- Bake in preheated oven for 22 to 25 minutes until edges are golden brown.
- Allow the bars to cool completely in the pan before slicing.
Leave a Reply