
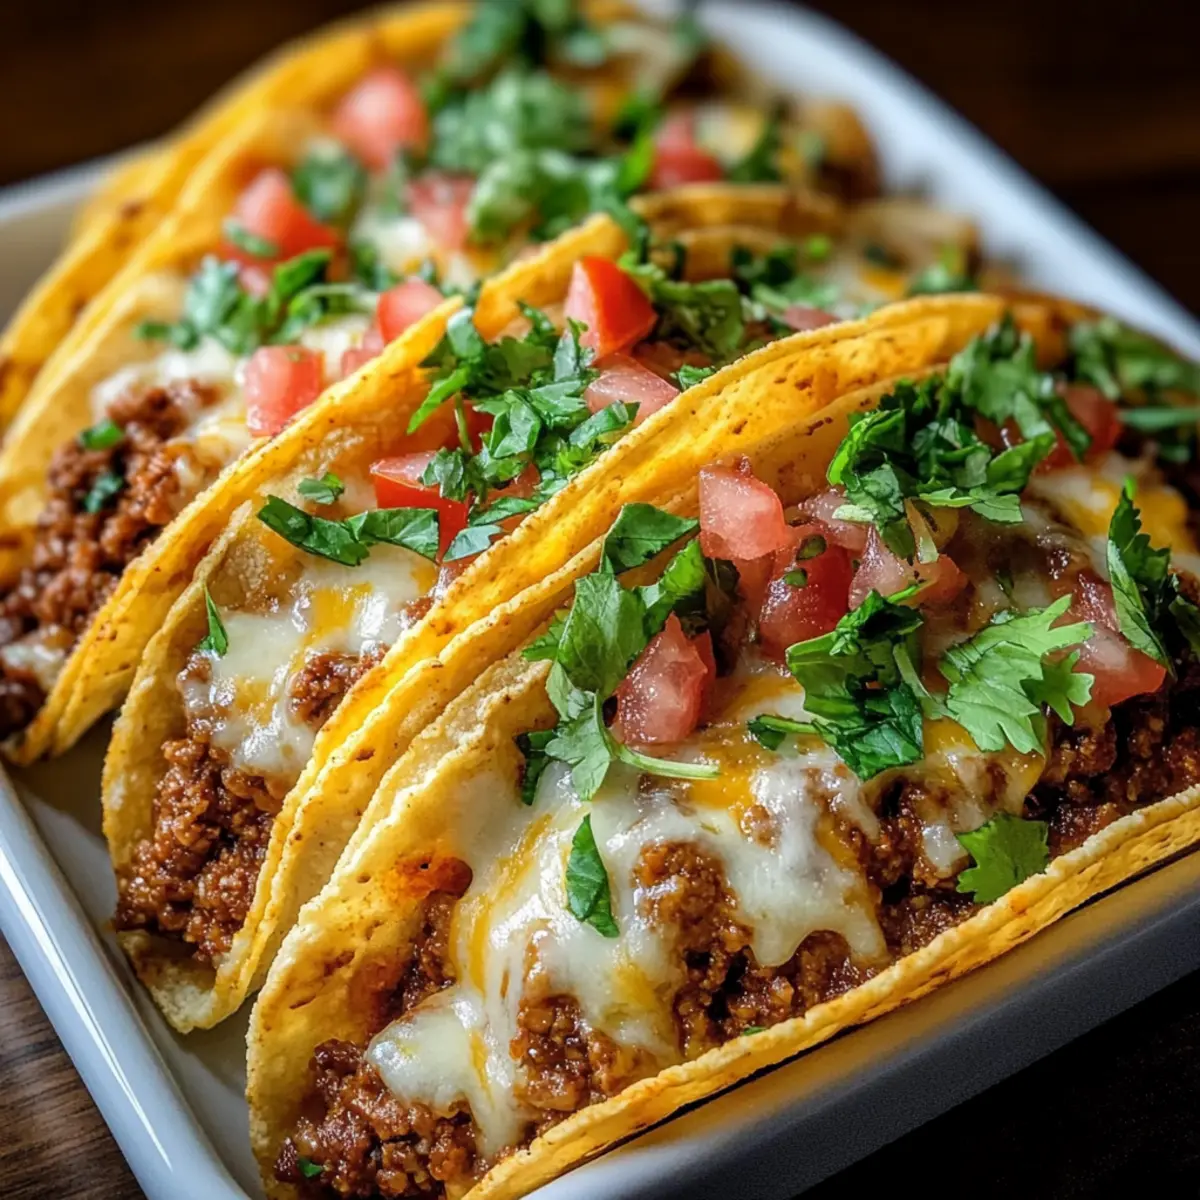
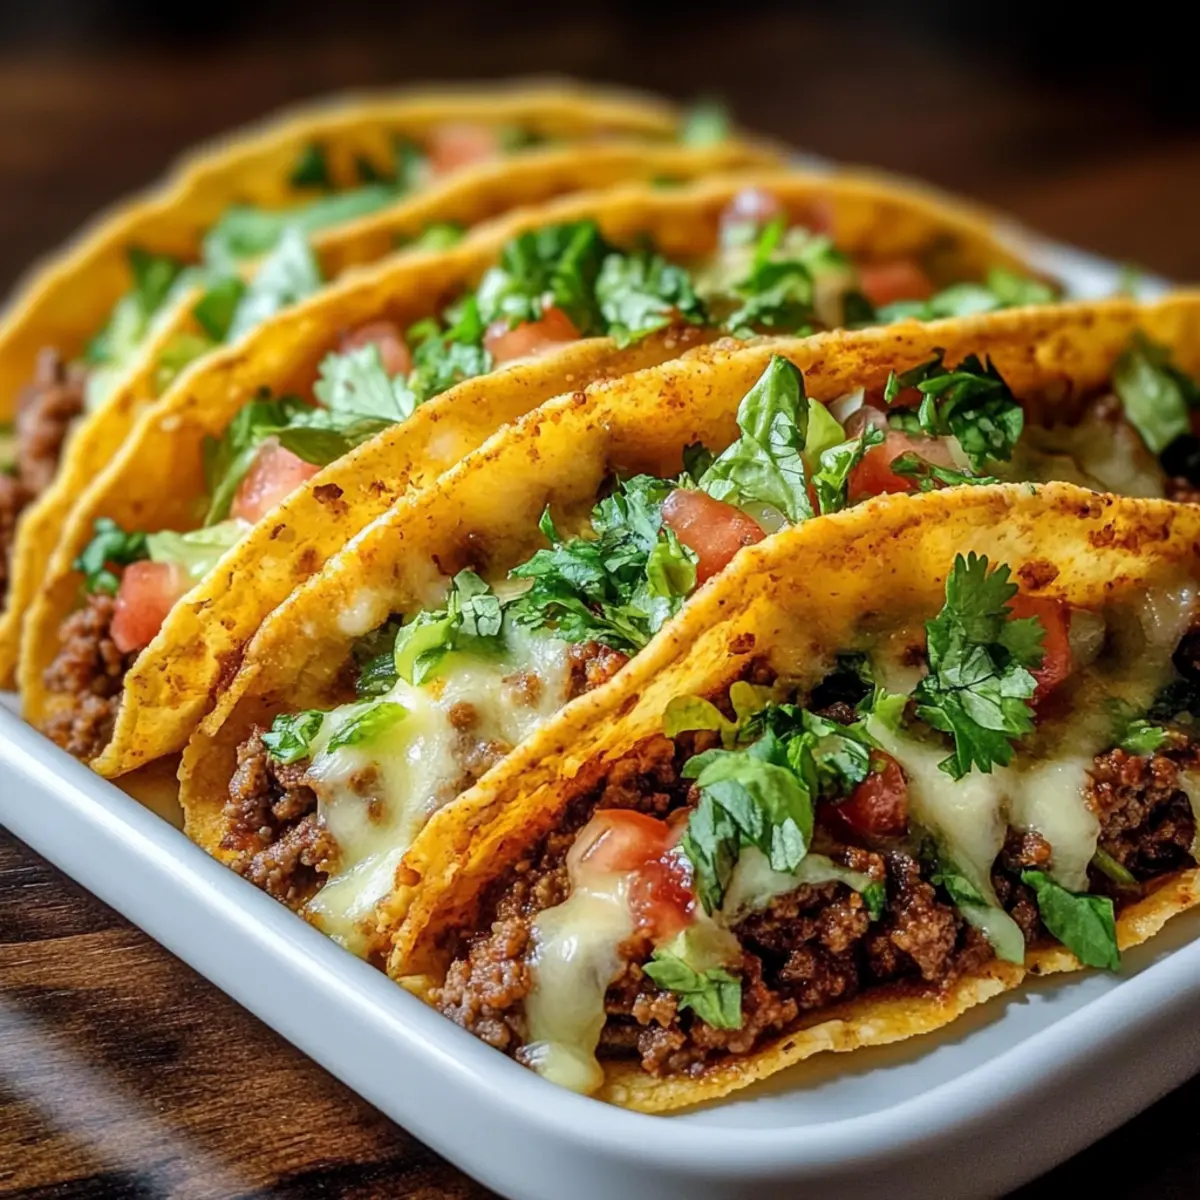
“Can you hear that? The sound of crispy taco shells eagerly awaiting their delicious filling!” My journey into crafting the perfect weeknight dinner took an exciting turn with these Oven-Baked Cheesy Tacos. They’re quick to whip up and pack a punch of comfort, making them an instant family favorite. Imagine biting into a taco that’s not only crispy on the outside but also loaded with seasoned beef and gooey, melted cheese. With just 30 minutes of prep time, this recipe is perfect for busy evenings or casual hangouts with friends. Plus, you have the freedom to customize your toppings—it’s a versatile dish that can accommodate everyone’s taste. Are you ready to transform your taco night? Let’s dive into this mouthwatering recipe together!

Why Choose Oven-Baked Cheesy Tacos?
Crispy, Crunchy Goodness: Each bite delivers a satisfying crunch that elevates taco night to a whole new level.
Quick to Make: In just 30 minutes, you’ll have a feast that’s perfect for busy weeknights or spontaneous gatherings.
Customizable Toppings: Personalize each taco with your choice of fresh toppings, like crispy lettuce or spicy jalapeños.
Family-Friendly Flavor: Loaded with seasoned beef and gooey cheese, these tacos are a sure hit with kids and adults alike.
Leftover Friendly: Make-ahead options mean you’ll have tasty tacos ready to go for those evenings when time is at a premium! Give these Oven-Baked Cheesy Tacos a try, and you’ll wonder how you ever lived without them!
Oven-Baked Cheesy Tacos Ingredients
For the Filling
• Ground Beef – This main protein source gives the tacos flavor and heartiness; feel free to substitute with ground turkey or a plant-based option like lentils for a healthier twist.
• Onion – Finely diced, this enhances the flavor profile and aroma; a yellow onion works great for a balanced taste.
• Garlic – Fresh minced garlic adds depth and aroma; don’t skimp on this for maximum flavor.
• Taco Seasoning – Pre-mixed or homemade, it provides essential spices; using homemade allows you to control the heat.
• Tomato Sauce or Salsa – This adds moisture and richness to the beef filling; opt for your favorite salsa for an extra kick.
For the Shells and Cheese
• Hard Taco Shells – These sturdy shells hold all the goodness inside; make sure they’re fresh to prevent breakage during baking.
• Shredded Cheese – A blend of cheeses like cheddar and Monterey Jack helps create that gooey melt; try adding pepper jack for a little spice!
For the Fresh Toppings
• Lettuce – Adds crunch and freshness; shredded romaine is a popular choice.
• Tomatoes – Dice some fresh tomatoes for a splash of color and flavor; consider using cherry tomatoes for sweetness.
• Red Onion – Finely chopped for a zesty bite; soak in water beforehand to mellow the flavor.
• Cilantro – Chopped cilantro complements the tacos beautifully; for a milder taste, use green onions as a substitute.
• Optional Toppings – Customize with sour cream, guacamole, or sliced jalapeños to heat things up in your Oven-Baked Cheesy Tacos!
Step‑by‑Step Instructions for Oven-Baked Cheesy Tacos
Step 1: Preheat the Oven
Begin by preheating your oven to 400°F (200°C). This step is crucial for achieving crispy taco shells that hold all your tasty fillings. While the oven warms up, gather your baking dish—preferably a rectangular one—to hold the taco shells upright without tipping over.
Step 2: Arrange the Taco Shells
Once the oven is preheated, place the hard taco shells upright in your baking dish. Make sure they stand securely to prevent spills. This arrangement will help keep the fillings contained and allow for even baking. Set the dish aside as you prepare the flavorful filling for your Oven-Baked Cheesy Tacos.
Step 3: Cook the Ground Beef
In a skillet over medium heat, cook the ground beef along with the finely diced onion. Stir the mixture, breaking up the meat, until the beef is browned and the onion is translucent—this should take about 5-7 minutes. Once cooked, drain off any excess fat to keep the filling light and delicious.
Step 4: Add Seasonings
With the ground beef mixture still on medium heat, stir in the minced garlic and taco seasoning. Cook for another minute, allowing the garlic to become fragrant and the spices to meld. This step infuses the meat with flavor and will elevate your Oven-Baked Cheesy Tacos to new heights.
Step 5: Incorporate Tomato Sauce
Next, add either tomato sauce or your favorite salsa to the beef mixture and stir well. Lower the heat and let it simmer for about 5 minutes. This allows all the flavors to meld together and creates a deliciously moist filling for your tacos.
Step 6: Fill the Taco Shells
Now, carefully spoon the seasoned beef mixture into each taco shell, filling them generously. Ensure each shell gets a good amount of filling to make every bite satisfying. Top each filled taco liberally with shredded cheese, which will melt deliciously as they bake.
Step 7: Bake the Tacos
Place the baking dish with your filled taco shells in the preheated oven and bake for 10-15 minutes. Keep an eye on them; they are done when the cheese is beautifully melted and bubbly, and the shells turn a lovely golden color.
Step 8: Add Fresh Toppings and Serve
Once baked, remove the Oven-Baked Cheesy Tacos from the oven and allow them to cool for a couple of minutes. Top with your choice of fresh garnishes like shredded lettuce, diced tomatoes, or chopped cilantro. Serve warm with your favorite sides, ready to enjoy!

Oven-Baked Cheesy Tacos Variations
Feel free to get creative with these Oven-Baked Cheesy Tacos and make them your own!
- Gluten-Free: Use corn taco shells instead of traditional wheat-based shells for a delightful, gluten-free alternative.
- Vegetarian: Swap ground beef for black beans or lentils, adding more veggies like bell peppers for a hearty plant-based twist.
- Spicy Kick: Mix in diced jalapeños with the beef or add hot salsa for those who enjoy a bit of heat in their tacos.
- Cheese Lover’s Delight: Experiment with mix-and-match cheeses, such as gouda for its creamy texture or pepper jack for an extra spicy melt.
- Savory Herbs: Add fresh herbs like basil or oregano to the beef mixture for a fragrant touch that elevates the overall flavor.
- Health Boost: Mix in cooked quinoa or brown rice with ground beef to add texture and enhance the nutritional value—delicious and wholesome!
- Crunchy Toppings: Toss on some crushed tortilla chips before serving for an irresistible crunch that will delight all your senses.
If you want a fun twist for a family gathering, try pairing these tacos with some Oven-Baked Cheesy Tacos and a fresh, zesty salad to create a vibrant meal that everyone will love!
What to Serve with Oven-Baked Cheesy Tacos
Adding delightful sides can transform your taco night into an unforgettable feast!
- Crispy Guacamole: Creamy and spicy, this fresh dip balances the crunch of the tacos with its rich texture.
- Spicy Black Beans: A flavorful addition that complements the seasoned beef, adding protein and fiber to your meal. Enjoy the heartiness!
- Zesty Mexican Street Corn: Topped with cheese and lime, this dish brings vibrant sweetness that contrasts beautifully with savory tacos.
- Mixed Green Salad: A refreshing medley of lettuce, tomatoes, and avocados gives a crisp, light counterpoint to the richness of the tacos.
- Sour Cream and Salsa: Classic accompaniments; the coolness of sour cream and tang of salsa enhance the taco flavor profile perfectly.
- Chilled Margarita: This refreshing drink adds a festive touch and balances the rich, savory notes of the tacos with its citrusy bite.
- Fruit Salad: A sweet and fruity side brings a refreshing finish, offering a light, beautiful contrast to your savory feast.
Expert Tips for Oven-Baked Cheesy Tacos
Preheat Properly: Ensure your oven reaches 400°F before baking; this guarantees perfectly crispy taco shells.
Drain Fat: After cooking the ground beef, drain off excess fat to keep the filling lighter and prevent soggy tacos.
Don’t Overfill: Fill each taco shell generously but avoid overstuffing; this helps prevent spills while baking.
Watch the Time: Bake until the cheese is bubbly and golden; overbaking can lead to dry shells and filling.
Customize Freely: Feel free to experiment with different toppings for your Oven-Baked Cheesy Tacos, such as jalapeños, corn, or avocado for extra flavor.
How to Store and Freeze Oven-Baked Cheesy Tacos
Fridge: Store leftover Oven-Baked Cheesy Tacos in an airtight container for up to 3 days. This helps retain their flavor and prevents sogginess.
Freezer: For longer storage, freeze assembled but unbaked tacos in a single layer, then transfer to a freezer-safe container for up to 2 months.
Reheating: Reheat baked tacos in the oven at 350°F (175°C) for about 10 minutes to restore crispness. Avoid microwaving, as it can make the shells soggy.
Assemble Ahead: Prepping unbaked tacos and storing them in the fridge allows for a quick dinner. Just pop them in the oven when ready to serve!
Make Ahead Options
These Oven-Baked Cheesy Tacos are a fantastic meal prep solution for busy weeknights! You can assemble the tacos (without baking) up to 24 hours in advance; simply fill the hard taco shells with the seasoned beef mixture and shredded cheese, then refrigerate them until you’re ready to bake. When it’s time to enjoy, just preheat your oven and bake for 10-15 minutes until the cheese is melted and the shells are crispy. If you have any leftovers, they can be stored in an airtight container in the fridge for up to 3 days. Just reheat in the oven for best results, ensuring they stay deliciously crispy. This makes serving a breeze, leaving you more time to savor family moments!
Oven-Baked Cheesy Tacos Recipe FAQs
How do I select the best ground beef?
Absolutely! When choosing ground beef, look for a blend of 80% lean meat and 20% fat for the best flavor and moisture. If you prefer a leaner option, ground turkey or chicken can offer a lighter profile. Make sure to check the expiration date, and if possible, inspect the color; it should be bright red, with minimal dark spots.
How should I store leftover Oven-Baked Cheesy Tacos?
Great question! Store any leftover Oven-Baked Cheesy Tacos in an airtight container in the fridge for up to 3 days. To reheat, place them in the oven at 350°F (175°C) for about 10 minutes. This will help retain their crispiness, as microwaving tends to make the shells soggy.
Can I freeze assembled Oven-Baked Cheesy Tacos?
Yes, you can! For freezing, assemble the unbaked tacos and place them in a single layer on a baking sheet. Freeze until solid, then transfer them to a freezer-safe container or bag for up to 2 months. When you’re ready to enjoy, bake them straight from the freezer, adding an extra few minutes to the baking time.
What should I do if my taco shells break during baking?
Very! If your taco shells break, it often means they were too fragile or stale. To prevent this, choose fresh hard taco shells and ensure they are sturdy. If they do break, consider using them as a base for a taco salad or layering them in a casserole dish with all the filling.
Are these tacos suitable for people with gluten allergies?
Absolutely! To make these Oven-Baked Cheesy Tacos gluten-free, simply opt for gluten-free taco shells, which are widely available. For additional dietary considerations, be mindful of the taco seasoning—some mixes may contain gluten, so check the label or make your own to ensure they are safe.
Oven-Baked Cheesy Tacos: Crispy Comfort in Every Bite
Ingredients
Equipment
Method
- Preheat your oven to 400°F (200°C).
- Arrange the hard taco shells upright in the baking dish.
- Cook the ground beef with the onion in a skillet over medium heat for 5-7 minutes until browned.
- Stir in the minced garlic and taco seasoning; cook for another minute.
- Add tomato sauce or salsa to the mixture and let simmer for 5 minutes.
- Fill taco shells with the beef mixture and top with shredded cheese.
- Bake the tacos in the oven for 10-15 minutes until cheese is melted and bubbly.
- Remove from the oven and top with fresh garnishes before serving.
Leave a Reply