
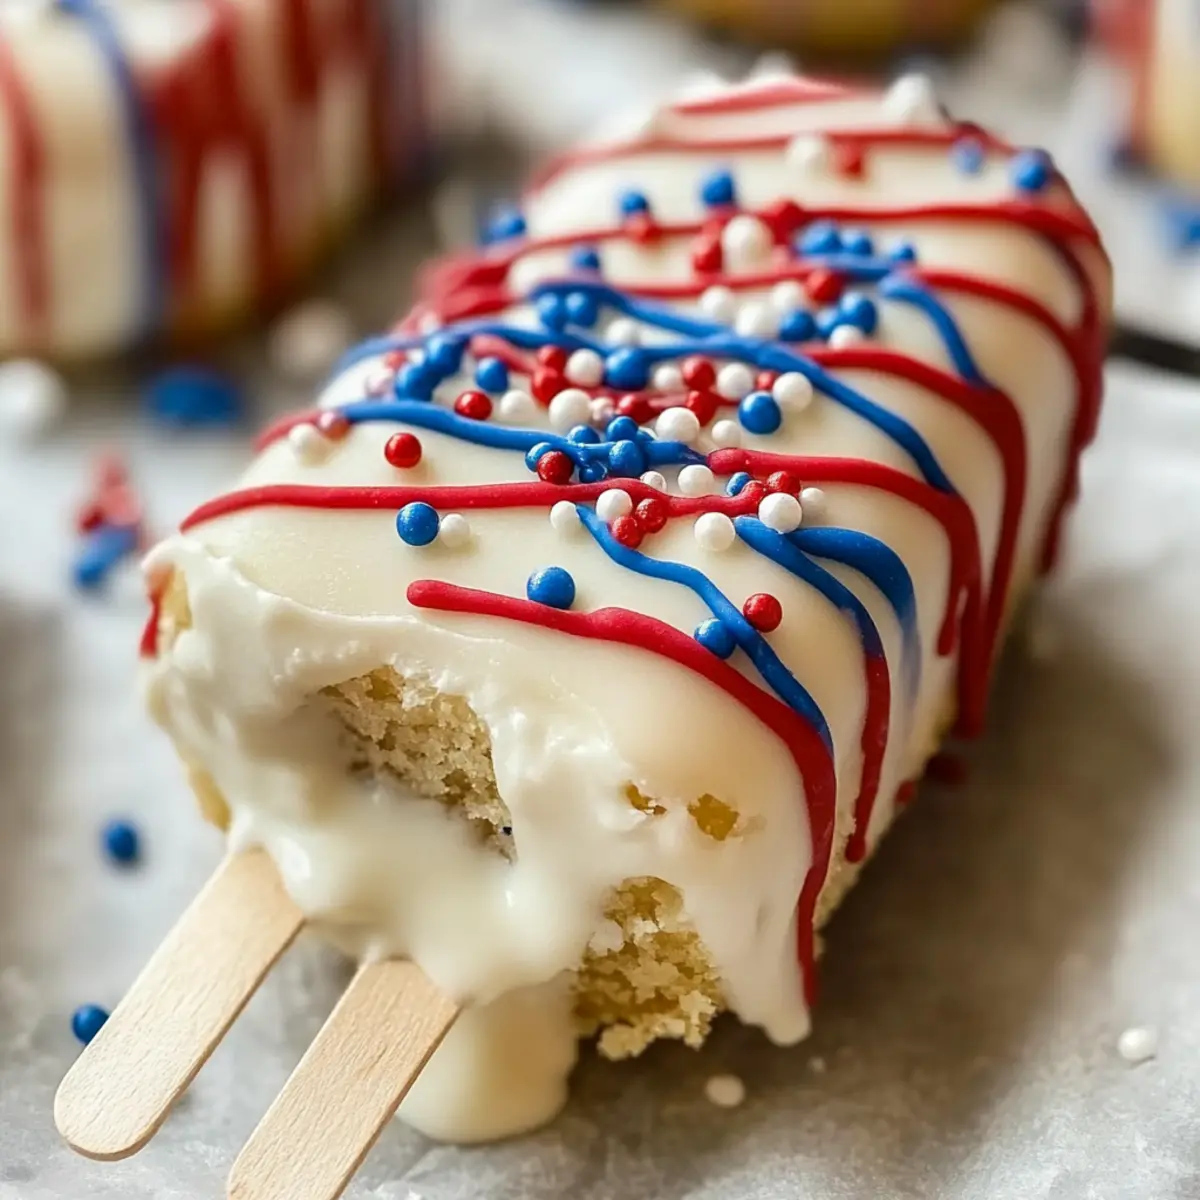
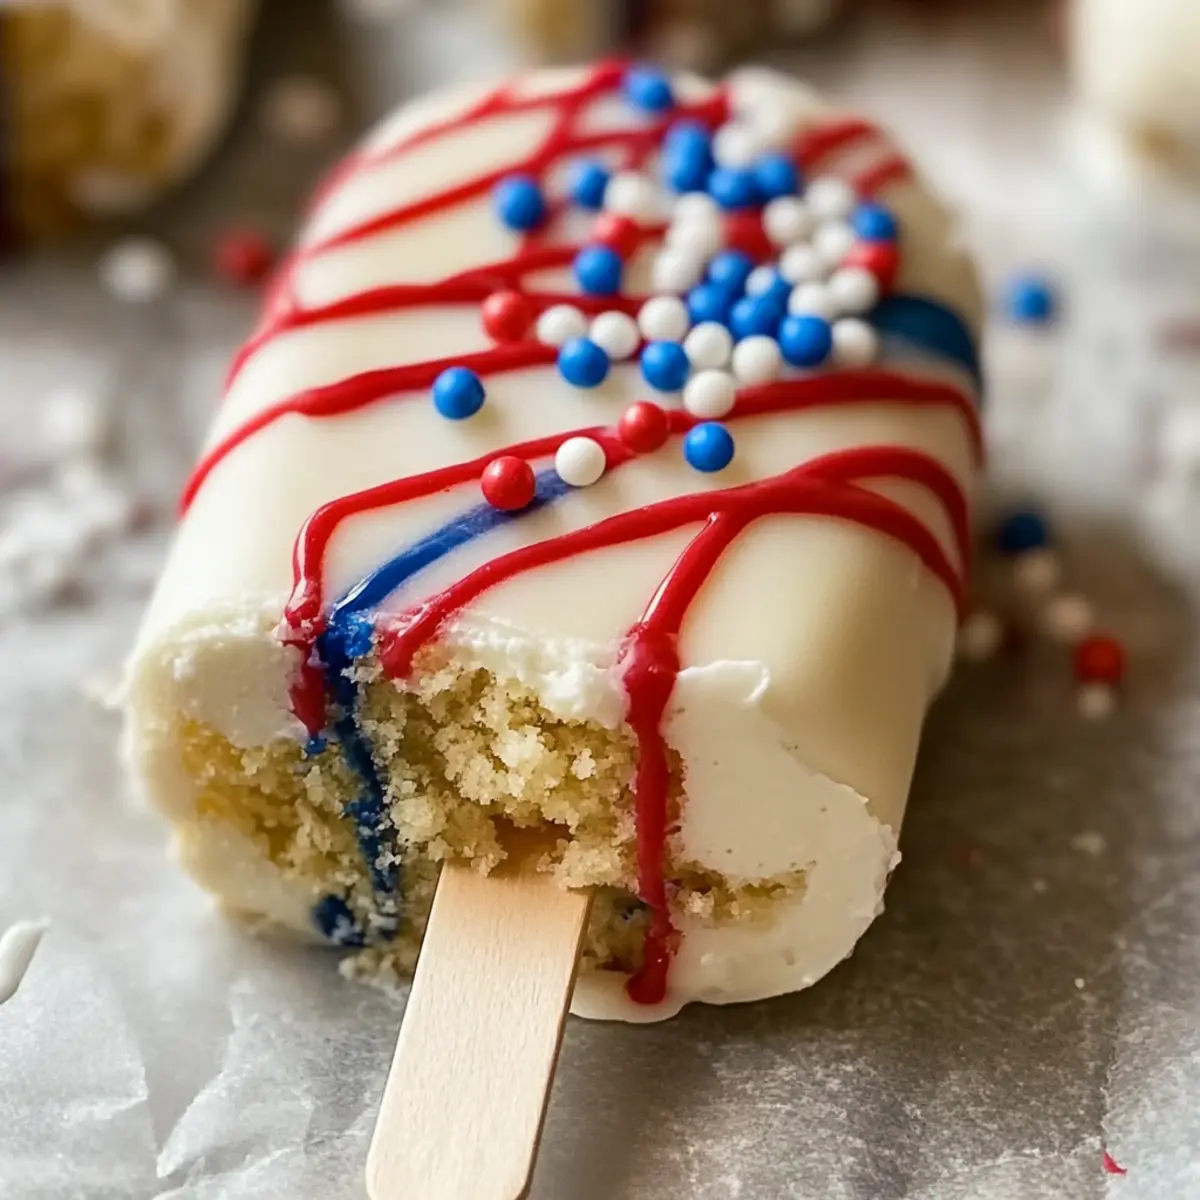
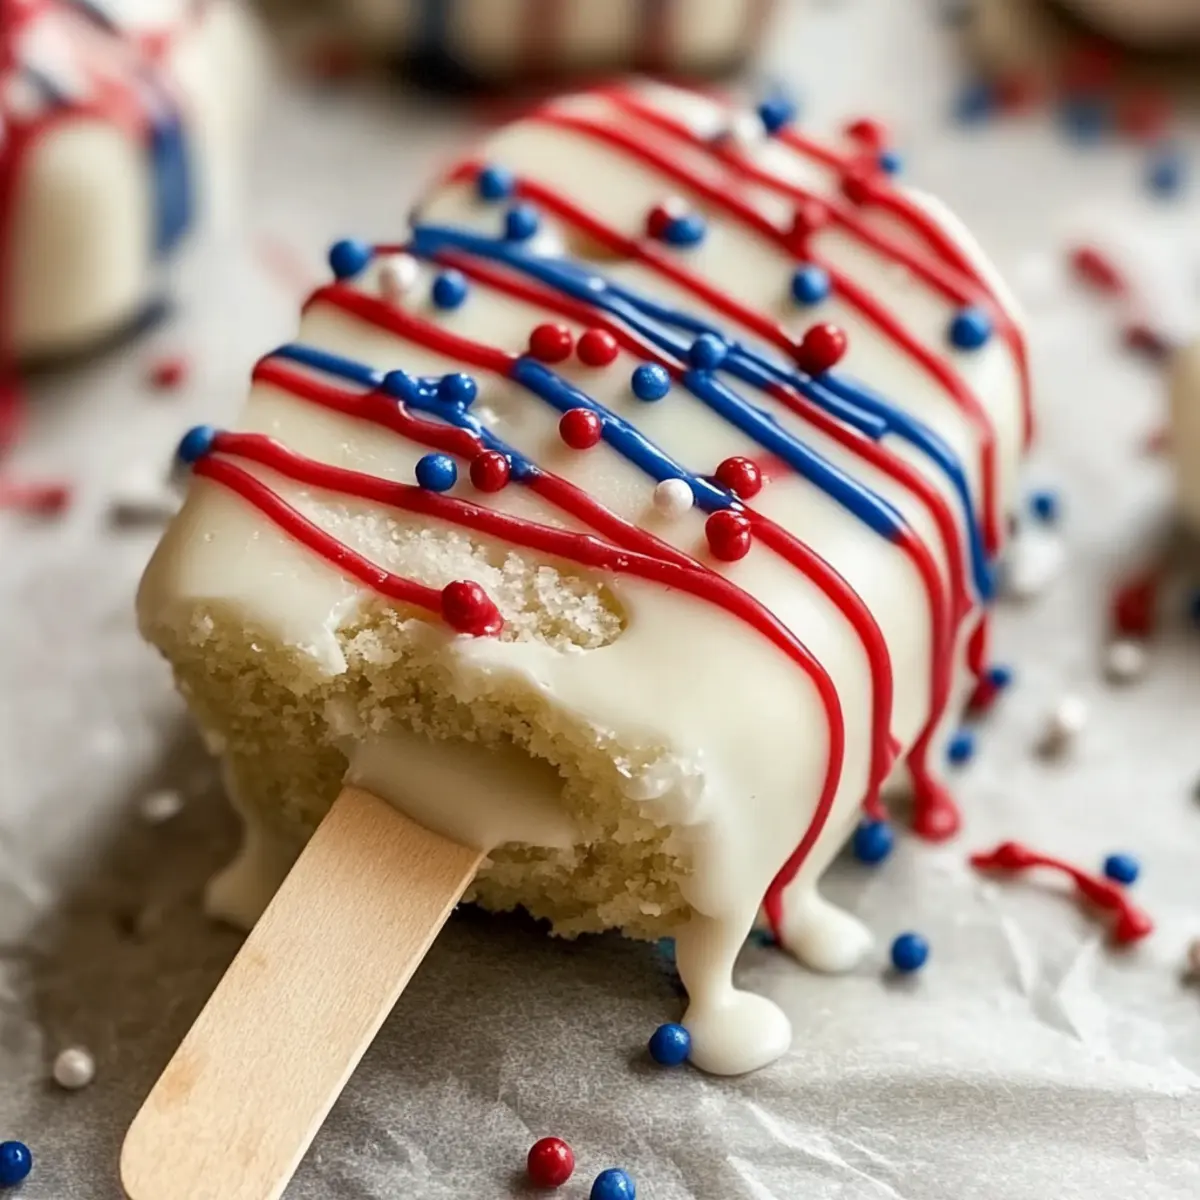
What’s better than a classic barbecue or picnic on the 4th of July? How about a delightful dessert experience that doubles as a creative activity! My Easy 4th of July Cakesicles are not only a visual treat with their red, white, and blue colors, but they also require no baking, making them incredibly simple to whip up. With a delicious combination of soft vanilla cake and rich frosting encased in smooth white chocolate, these cakesicles are perfect for the whole family to get involved in decorating. Plus, they store easily in the freezer, allowing you to prepare them ahead of time for those summer gatherings. Intrigued by these festive, kid-friendly delights? Let’s dive into how to create these patriotic sweets that will wow your guests!
Why Are These Cakesicles So Fun?
Delightful visuals: Bright, festive colors make these cakesicles perfect for 4th of July celebrations, igniting joy in every bite.
No-bake simplicity: With easy steps and minimal ingredients, even novice bakers can impress guests without the heat of the oven.
Kid-friendly fun: Involve your little ones in the decorating process, fostering creativity and excitement while they help make these patriotic treats.
Versatile variations: Transform this recipe for any occasion! Change colors, cake flavors, or fillings to suit holidays like Easter or Christmas.
Freezer-friendly: Make ahead and keep them on hand for spontaneous summer gatherings or family picnics, ensuring dessert is never a hassle.
When you’re ready to create a delicious and visually stunning dessert, check out my other easy summer desserts for more inspiration!
4th of July Cakesicles Ingredients
For the Cakesicle Base
• Vanilla Cake – Provides a sweet, soft foundation; use any leftover cake or a boxed mix for convenience.
• Vanilla Frosting – Acts as a binder that keeps the cake mixture together; store-bought buttercream simplifies the process.
For the Coating
• White Candy Melts – Essential for a smooth outer shell; opt for high-quality brands for the best results.
• Coconut Oil – Thins melted candy melts, ensuring an even, easy dip without graininess.
For the Decoration
• Powdered Sugar – Mixed with water to form the icing for drizzling; add food coloring for vibrant hues.
• Gel Food Coloring (Red & Blue) – Perfect for bold colors; gel maintains consistency without thinning the icing.
• White Sugar Pearl Sprinkles – Add sparkle and fun by pressing them into the wet icing; they adhere well when still soft.
For Assembly
• Popsicle Sticks – Essential for shaping and enjoying your cakesicles, making them fun to eat!
Get ready to make these delightful 4th of July cakesicles that are sure to steal the show at your summer celebrations!
Step‑by‑Step Instructions for 4th of July Cakesicles
Step 1: Crumble the Cake
Begin by crumbling the vanilla cake into a large bowl until you’ve broken it down to fine crumbs, ensuring no large chunks remain. This crucial step creates a uniform texture for your 4th of July cakesicles. Aim for a fluffy, powdered consistency to allow for easy mixing with the frosting.
Step 2: Mix in Frosting
Add the vanilla frosting to the cake crumbs in the bowl, using your hands or a spatula to combine thoroughly. Mix until a soft, moldable dough forms, reminiscent of play dough but not overly sticky. This binding mixture will hold your cakesicles together, so ensure it’s well blended without excess frosting.
Step 3: Shape the Cakesicles
Take your cakesicle mold and firmly press the cake mixture into each cavity, smoothing the tops with your fingers for an even finish. This step is important, as the shape you create will define the final look of your 4th of July cakesicles. Fill each mold completely to avoid air pockets.
Step 4: Freeze for Structure
Insert popsicle sticks into each filled cavity, ensuring they’re centered and standing upright. Place the mold in the freezer for at least 30 minutes. This chilling time solidifies the mixture, making it easier to dip once frozen, and is crucial for maintaining the cakesicle shape during the following steps.
Step 5: Melt the Candy Coating
While the cakesicles freeze, prepare the white candy melts by placing them in a microwave-safe bowl. Heat in 15-20 second intervals, stirring after each interval until the mixture is completely smooth. If necessary, stir in a small amount of coconut oil to achieve a silky texture that will coat your cakesicles evenly.
Step 6: Dip the Frozen Cakesicles
Once the cakesicles are frozen and firm, carefully remove them from the mold. Dip each one into the melted candy coating, ensuring it is fully submerged for a smooth, even shell. Allow any excess to drip off, then place the dipped cakesicles on a parchment-lined tray to set.
Step 7: Prepare the Icing
In a separate bowl, combine powdered sugar with just enough water to create a thick but pourable icing. Divide this icing into two small bowls, adding gel food coloring to one for a vibrant red and to the other for blue. Mix well to incorporate the colors thoroughly, ensuring a bright finish for your decorations.
Step 8: Decorate the Cakesicles
Drizzle the colored icing over each of the set cakesicles, using a spoon or piping bag for precision. Immediately press white sugar pearl sprinkles into the wet icing, which will cling beautifully and add festive flair. Allow the decorated cakesicles to sit at room temperature until the icing sets completely before serving.

How to Store and Freeze 4th of July Cakesicles
Fridge: Store your cakesicles in an airtight container for up to 5 days, ensuring each is well wrapped to maintain freshness.
Freezer: To freeze, wrap each cakesicle individually in plastic wrap, then place them in a zip-top freezer bag. They can stay frozen for up to 1 month.
Thawing: When ready to enjoy, thaw the cakesicles overnight in the fridge for the best texture before serving.
Reheating: There’s no need to reheat; simply enjoy them chilled or at room temperature for a delightful treat!
What to Serve with Easy 4th of July Cakesicles?
Create a memorable spread that complements these delightful treats while captivating your guests’ senses with vibrant flavors and textures.
- Grilled Hot Dogs: Simple, classic hot dogs bring a satisfying contrast with their savory taste, perfect for balancing the sweetness of cakesicles.
- Patriotic Fruit Platter: A colorful assortment of strawberries, blueberries, and banana slices provides refreshing bites that mirror the red, white, and blue theme.
- Classic Coleslaw: Creamy and crunchy, this slaw adds a tangy touch, enhancing the meal’s freshness while elevating the festive spirit of summer gatherings.
- Corn on the Cob: Sweet and succulent corn, seasoned with a dash of butter and salt, offers a delightful crunch that pairs beautifully with the cakesicles’ softness.
- Sparkling Lemonade: Refreshing and bright, this zingy drink adds a thirst-quenching touch that complements the sweet richness of your cakesicles.
- Chips and Salsa: The crunchy texture of chips combined with the spicy punch of fresh salsa creates an exciting contrast to the cakesicles, inviting a variety of tastes.
- Chocolate-Dipped Strawberries: For a sweet ending, the irresistible combination of strawberries and chocolate offers an indulgent bite that echoes the cakesicles’ fun theme.
- Ice Cream Sundae Bar: Let your guests create their own sundaes with various toppings and syrups, indulging the ambiance of summer treats while tying in the festive fun!
Expert Tips for 4th of July Cakesicles
-
Keep Them Frozen: Ensure your cakesicles are fully frozen before dipping; this helps maintain their shape and prevents melting.
-
Frosting Balance: Avoid adding too much frosting; too soft a mixture may not hold well in the mold, ensuring solid cakesicles.
-
Melted Coating: Stir melted candy melts regularly and never overheat them to prevent a grainy texture, keeping your coating smooth.
-
Rest Before Dipping: Allow cakesicles to sit briefly at room temperature before dipping; this balances temperature and prevents cracking.
-
Silicone Molds: Use silicone molds for easier removal and to maintain the beautiful shape of your 4th of July cakesicles.
Make Ahead Options
These 4th of July Cakesicles are perfect for busy home cooks looking to save time during summer celebrations! You can prepare the cakesicle base (cake and frosting mixture) up to 24 hours in advance by storing it in the refrigerator in an airtight container. Additionally, once molded, the cakesicles can be frozen for up to a month. Just remember to allow them to freeze entirely after shaping—this ensures they hold their form when dipped. When ready to serve, simply dip them in melted candy coating and decorate them as desired; they’ll be just as delicious as if made fresh!
4th of July Cakesicles Variations
Feel free to explore and personalize your cakesicles for a fun twist everyone will love!
-
Chocolate Base: Swap vanilla cake for chocolate cake for a rich, indulgent flavor that’s sure to please chocolate lovers.
-
Red Velvet Delight: Use red velvet cake to provide a stunning color and unique taste that pairs wonderfully with cream cheese frosting.
-
Fruit-Filled Surprise: Add layers of Nutella or fruit preserves within the cakesicle for a deliciously sweet surprise that elevates each bite.
-
Seasonal Colors: Change gel food coloring to pastels for Easter or greens and reds for Christmas to transform this recipe for any celebration.
-
Coconut Twist: Incorporate shredded coconut into the cake mixture for added texture and a tropical flavor that will whisk you away to a sunny paradise.
-
Spicy Kick: Add a dash of cayenne pepper to your chocolate coating for a playful and unexpected hint of heat that complements the sweet chocolate.
-
Nutty Flavor: Mix in chopped nuts like almonds or walnuts to the cake base for wonderful crunch and depth in your cakesicles.
Let your creativity shine as you mix and match these ideas while you create your delicious 4th of July cakesicles!
4th of July Cakesicles Recipe FAQs
What type of vanilla cake should I use for the cakesicles?
Absolutely! You can use any vanilla cake, whether it’s leftover from another dessert, a boxed mix, or a homemade recipe. Opt for a moist cake to ensure delightful, soft cakesicles, as it will mix beautifully with the frosting for binding.
How should I store my 4th of July cakesicles?
Very simply! Store your cakesicles in an airtight container in the fridge for up to 5 days. Just make sure they’re wrapped well to keep them fresh and prevent them from drying out.
Can I freeze my cakesicles for later enjoyment?
Of course! To freeze, individually wrap each cakesicle in plastic wrap, then place them in a zip-top freezer bag. They will maintain their quality for up to 1 month. When you’re ready to enjoy, simply thaw in the fridge overnight!
What if my melted candy coating is grainy?
No worries! If you find your melted candy melts are grainy, it’s likely due to overheating. To fix this, make sure to melt them in short increments of 15-20 seconds, stirring in between until smooth. If necessary, mix in a small amount of coconut oil to achieve that silky finish.
Are there any dietary considerations for my pets?
Very much so! While cakesicles are fun and festive for us, the ingredients, especially chocolate and certain candies, can be harmful to pets. Always keep these treats out of reach of your furry friends. If you’re looking for pet-friendly desserts, consider making a separate, simple treat just for them!
Can I change the colors for different holidays?
The more the merrier! Feel free to adapt this recipe for any celebration by changing up the colors and fillings. Pastel colors work beautifully for Easter, while green and red are perfect for Christmas. Just swap the gel food coloring to match your festive theme!
Charming 4th of July Cakesicles You'll Love to Make and Share
Ingredients
Equipment
Method
- Crumble the vanilla cake into a large bowl until fine crumbs form.
- Mix in the vanilla frosting until a soft, moldable dough forms.
- Press the cake mixture into the cakesicle mold, smoothing the tops.
- Insert popsicle sticks and freeze for at least 30 minutes.
- Melt the white candy melts in a microwave in intervals until smooth, adding coconut oil as needed.
- Dip the frozen cakesicles into the melted candy coating.
- Prepare icing by mixing powdered sugar with water and coloring.
- Drizzle colored icing over cakesicles and add sprinkles while wet.
Leave a Reply